Project E
- Released
-
29 November 2021 - Submission
-
Deadline 16 December 2021 @ 8 AM EDT Where Web Submit Name E Files E.zip - Version
-
1.8 12 December 2021 Add Dev Tip for Setting up VS Code. 1.7 11 December 2021 Fix typo in ProductServicein D.3.1.6 9 December 2021 Critical fix for Project C & D session in C. 1.5 9 December 2021 Revised instruction in D.6 for CategoryCardComponent.1.4 8 December 2021 Minor update to E.5. 1.3 4 December 2021 Fixed typo & UI bug in styles.css. Discussion. 1.2 4 December 2021 Fixed getCategoryById()inProductService.1.1 4 December 2021 Added reference implementation here 1.0 3 December 2021 Release 0.2 1 December 2021 Fixed various mistakes 0.1 30 November 2021 Draft
Table of contents
Executive Summary
This project is essentially a remake of Project D but with the frontend implemented in Angular and with a couple of views added. This project is intended to complete the exposure to the building blocks of typical shopping-cart web applications.
The Environment
For the frontend, issue the ngGo command and supply a folder name (for instance E). The official docs for the Angular framework is at angular.io. The documentation for TypeScript is at typescriptlang.org and for RxJS is at rxjs.dev. The topics and resources listed below are particularly helpful.
Tip: Setting up VS Code for Angular Development
If you are using VS Code as your development environment (recommended) and have more than 78 MB to spare in your account, you can install the Angular Language Service extension. This extension gives you syntax highlighting, code validation, and auto-completion within your Angular templates.
Before you install, check your quota by running:
$ quota -vIf you have more than 100 MB (78 MB + a ~20 MB buffer), then go ahead and install it. If you don’t have 78 MB of free space or close to reaching your quota, you will need to free up some space in your account. You can use the command
ncdu ~to found out which files in your account are used the most space.To install it:
- Open Visual Studio Code.
- Go to the
Extensionstab within VS Code,- Search for
Angular,- Select
Angular Language ServicebyAngular.- Then click
Install.
The Backend
You will be using the services you created in Projects A through D plus any needed service for the added views. You are free to re-use these services as-is or to re-implement them in a different platform (TCP Socket, Tomcat, or NodeJS) or with different specs. In all cases, make sure you include the CORS header in all services as in Project D.
Cross-Origin Resource Sharing (CORS)
Cross-Origin Resource Sharing (CORS) is an HTTP-header based mechanism that allows a server to indicate any origins (domain, scheme, or port) other than its own from which a browser should permit loading resources. CORS also relies on a mechanism by which browsers make a “preflight” request to the server hosting the cross-origin resource, in order to check that the server will permit the actual request. In that preflight, the browser sends headers that indicate the HTTP method and headers that will be used in the actual request. To enable CORS, add this middleware function to your
index.js:// Enable CORS app.use((req, res, next) => { res.header("Access-Control-Allow-Origin", "*"); res.header("Access-Control-Allow-Headers", "*"); next(); });Or alternatively,
const cors = require('cors');

app.use(cors());
Cart (Session) Not Persisting with Angular as Frontend
When running Angular and Express with different ports, for some reason despite CORS being enabled, each session is not persistent with Express, because Angular seesm to be failing to send the session ID cookie in its request headers to the Express server. To fix this, we need to create a
proxy.conf.jsonfile in your project root directory and put the following content in it:{ "/Catalog": { "target": "http://localhost:44130", "secure": false, "logLevel": "debug" }, "/api/*": { "target": "http://localhost:3000", "secure": false, "logLevel": "debug" } }Replace the
targetaddresses’ port numbers with the ports that your Express servers in Project C and D are listening to. If you combined your Project C and D, you can delete the/Catalogentry.Next, we need to modify the
angular.jsonas follows, using theng configcommand within the terminal (Eis the name of the project):$ ng config 'projects.E.architect.serve.configurations.development.proxyConfig' \ './proxy.conf.json'This should add the property
proxyConfigwith the value"./proxy.conf.json"at around line 103. Like this:{ ... "projects": { "E": { ... "architect": { ... "serve": { "builder": "@angular-devkit/build-angular:dev-server", "configurations": { "production": { "browserTarget": "E:build:production" }, "development": { "browserTarget": "E:build:development", "proxyConfig": "./proxy.conf.json" } }, "defaultConfiguration": "development" }, ...Now, restart your Angular server, by stopping the running service (via
CTRL+C) and runningng serveagain.References:
Cart (Session) Is Still Not Persisting with Angular as Frontend
If you are using both your Project C’s and D’s backend, even via Angular’s proxy, your cart still might not work. The cart might not be persisting. On closer inspection, you might notice that the session ID changes with each request to update the Cart.
The reason for this is both Project C and D use session cookies and have the same IP addresses, despite having different port numbers. When using the proxy, this is even worse as both use Angular’s
ng serveport. Thus, the two interfere with each other’s session cookies.To resolve this, go to your Project C’s
index.jsand add thenameattribute to the Express session configurations, like this:app.enable('trust proxy'); app.use(session({ name: 'project-C', // add this secret: 'secret', resave: true, saveUninitialized: true, proxy: true }));Then, do the same in your Project D’s
index.js, but instead name it:project-D. Restart both servers, Project C and D’s, and try adding items to your Cart. The Cart should update correctly, now.References:
The Frontend — Part 1
For a reference implementation, see: here.
Porting Project D to Angular
Your first task is to reimplement the Models R US application in Angular, porting it from plain JavaScript into Angular components and services. Most of templates in the original application correspond to a component within Angular, with the exceptions of product-card and cart-row which are small enough to be embedded within the larger view/page templates. The navigation bar at the top of the page also becomes an Angular Component.
For the CSS styling, download this styles.css and replace the src/styles.css in your Angular project with it. Additionally, within the src/index.html file, replace the page <title> with Models R US.
In my reference implementation, the templates correspond to 5 components in addition to the AppComponent and NavbarComponent for the navigation bar at the top of the page, as follows:
| Pure JS | Angular Component | Element |
|---|---|---|
<div id="page"> |
AppComponent | <app-root> |
<div class="navbar"> |
NavbarComponent | <app-navbar> |
| catalog-page | CatalogViewComponent | <app-catalog-view> |
| category-card | CategoryCardComponent | <app-category-card> |
| category-page | CategoryViewComponent | <app-category-view> |
| product-page | ProductDetailsComponent | <app-product-details> |
| cart-page | CartViewComponent | <app-cart-view> |
Not Sure Where the Templates Are?
Download the provided index.html from Project D. Open it in a text editor. In it, look for these
scripttags:<script id="template-name" type="text/x-template"> ... </script>The text content within each of these
scripttags is the HTML template that corresponds thetemplate-namethat identifies it. You can copy the markup over into the Angular Components. However, the variables{{ ... }}needed to be modified or changed in order to work with Angular’s interpolation system. For certain variables that are treated as currency (i.e.:${{ cost }}), these needed to be rewritten using thecurrencypipe, like this:{{ product.cost | currency }}
Your app.module.ts should look something like this:
import { NgModule             } from '@angular/core';
import { BrowserModule, Title } from '@angular/platform-browser';
import { HttpClientModule     } from '@angular/common/http';
import { RouterModule         } from '@angular/router';
import { FormsModule          } from '@angular/forms';

import { AppComponent            } from './app.component';
import { NavbarComponent         } from './components/navbar/navbar.component';
import { CatalogViewComponent    } from './components/catalog-view/catalog-view.component';
import { CategoryCardComponent   } from './components/category-card/category-card.component';
import { CategoryViewComponent   } from './components/category-view/category-view.component';
import { ProductDetailsComponent } from './components/product-details/product-details.component';
import { CartViewComponent       } from './components/cart-view/cart-view.component';

@NgModule({
  imports: [
    BrowserModule,
    HttpClientModule,
    FormsModule, // template-driven forms
    RouterModule.forRoot([
      { path: 'catalog',          component: CatalogViewComponent },
      { path: 'category/:catId',  component: CategoryViewComponent },
      { path: 'products/:prodId', component: CategoryViewComponent },
      { path: 'cart',             component: CartViewComponent },
      { path: '',   pathMatch: 'full', redirectTo: '/catalog' },
      { path: '**', pathMatch: 'full', redirectTo: '/catalog' },
    ])
  ],
  bootstrap: [AppComponent],
  providers: [
    Title
  ],
  declarations: [
    AppComponent,
    NavbarComponent,
    CatalogViewComponent,
    CategoryCardComponent,
    CategoryViewComponent,
    ProductDetailsComponent,
    CartViewComponent
  ]
})
export class AppModule { }
Project Structure
Project File Structure
The project file sructure (for Angular reimplementation of Project D; Part 1):
.
├── src
│   ├── app
│   │   ├── components
│   │   │   ├── cart-view/cart-view.component.ts
│   │   │   ├── catalog-view/catalog-view.component.ts
│   │   │   ├── category-card/category-card.component.ts
│   │   │   ├── category-view/category-view.component.ts
│   │   │   ├── navbar/navbar.component.ts
│   │   │   └── product-details/product-details.component.ts
│   │   ├── models
│   │   │   ├── cart.model.ts
│   │   │   └── product.model.ts
│   │   ├── services
│   │   │   ├── cart.service.ts
│   │   │   └── product.service.ts
│   │   ├── app.component.ts
│   │   └── app.module.ts
│   ├── assets
│   ├── environments
│   │   ├── environment.prod.ts
│   │   └── environment.ts
│   ├── favicon.ico
│   ├── index.html
│   ├── main.ts
│   ├── polyfills.ts
│   └── styles.css
├── angular.json
├── package.json
├── proxy.conf.json
├── README.md
├── tsconfig.app.json
└── tsconfig.json
Use the ng generate command to generate the necessary components and services:
$ ng generate component components/navbar
$ ng generate component components/catalog-view
$ ng generate component components/category-card
$ ng generate component components/category-view
$ ng generate component components/product-details
$ ng generate component components/cart-view
$ ng generate service services/product
$ ng generate service services/cart
Separating the HTML templates from the TypeScript (Personal Preference)
Normally, the
ng generate component my-componentcommand generates 4 files:
my-component.component.cssmy-component.component.htmlmy-component.component.spec.tsmy-component.component.tsHowever, I have set the flags
--skip-tests,--inline-template, and--inline-styleswhen create the project in thengGoscript. If you feel more comfortable keeping HTML templates separate from your TypeScript, before running the aboveng generate componentcommands, go into your project’sangular.jsonand change the following attribute (around line 15) tofalseor use theng configcommand (Eis the name of the project):$ ng config 'projects.E.schematics.@schematics/angular:component.inlineTemplate' falseLike this:
{
  ...
  "projects": {
    "E": {
      "projectType": "application",
      "schematics": {
        "@schematics/angular:component": {
          "inlineTemplate": false,
          "inlineStyle": true,
          "skipTests": true
        },
        ...
Alternatively, you can manually create an HTML file with the
.component.htmlsuffix, move the template HTML to that file and replace thetemplateattribute in the Component class decorator (annotation) withtemplateUrl. Like this:import { Component } from '@angular/core'; @Component({ selector: 'app-my-component', templateUrl: './my-component.component.html', styles: [] }) export class MyComponentComponent { ... }
Additionally, to create the models:
$ mkdir src/app/models
$ touch src/app/models/product.model.ts
$ touch src/app/models/cart.model.ts
Implement an API Service
Before implementing the components, we should implement an Angular service(s) to communicate with our backend API service. These are classes in Angular that encapsulate the logic for making AJAX requests to our backend server. Additionally, you should implement a number of TypeScript interfaces for the various data type that you will send to and from the server.
For my reference implementation, I have 2 services: the ProductService and CartService services. The ProductService provides methods for retrieving the Products by ID or by category and retrieving the Categories from the Catalog API. The CartService implements methods for retrieving the items within the cart and for updating the Cart. To support these two services, I implemented the following TypeScript interfaces: Product, Category and CartItem.
Product Service
src/app/services/product.service.ts(without caching):import { Injectable } from '@angular/core'; import { HttpClient } from '@angular/common/http'; import { Product, Category } from '../models/product.model'; @Injectable({ providedIn: 'root' }) export class ProductService { constructor(private http: HttpClient) { } getCatalog() { return this.http.get<Category[]>(`/Catalog`); // From Project C } getCategoryById(id: number): Observable<Category> { return new Observable<Category>((subscriber) => { // Use getCatalog instead of direct API call to avoid differences // in implementation and requirements between Project C and E. this.getCatalog().subscribe((categories) => { const category = categories.find(c => c.id === id); if (category) { subscriber.next(category); } else { subscriber.error({ status: 404, statusText: 'NOT FOUND' }); } subscriber.complete(); }); }); } getProductById(id: string) { return this.http.get<Product>(`/api/products/${id}`); } getProductsByCategory(catId: number) { return this.http.get<Product[]>(`/api/products/category/${catId}`); } }
src/app/services/product.service.ts(with caching):import { Injectable } from '@angular/core'; import { HttpClient } from '@angular/common/http'; import { Observable, of } from 'rxjs'; import { InMemoryCache } from '../models/in-memory-cache'; import { Product, Category } from '../models/product.model'; @Injectable({ providedIn: 'root' }) export class ProductService { constructor(private http: HttpClient) { } getCatalog(): Observable<Category[]> { const url = '/Catalog'; if (InMemoryCache.hasCache(url)) return InMemoryCache.getCache<Category[]>(url).observable; return (new InMemoryCache(url, new Observable<Category[]>(subscriber => { this.http.get<Category[]>(url).subscribe(categories => { subscriber.next(categories); subscriber.complete(); }); }))).observable; } getCategoryById(id: number): Observable<Category> { return new Observable<Category>((subscriber) => { // Use getCatalog instead of direct API call to avoid differences // in implementation and requirements between Project C and E. this.getCatalog().subscribe((categories) => { const category = categories.find(c => c.id === id); if (category) { subscriber.next(category); } else { subscriber.error({ status: 404, statusText: 'NOT FOUND' }); } subscriber.complete(); }); }); } getProductById(id: string): Observable<Product> { const url = `/api/products/${id}`; if (InMemoryCache.hasCache(url)) return InMemoryCache.getCache<Product>(url).observable; return (new InMemoryCache(url, this.http.get<Product>(url))).observable; } getProductsByCategory(catId: number): Observable<Product[]> { const url = `/api/products/category/${catId}`; if (InMemoryCache.hasCache(url)) return InMemoryCache.getCache<Product[]>(url).observable; return (new InMemoryCache(url, new Observable<Product[]>(subscriber => { this.http.get<Product[]>(url).subscribe(products => { products.forEach(p => InMemoryCache.putCache(`/api/products/${p.id}`, of(p))); subscriber.next(products); subscriber.complete(); }); }))).observable; } }
src/app/models/in-memory-cache.ts:import { Observable, of } from 'rxjs'; export class InMemoryCache<T> { private static sharedCache: { [name: string]: InMemoryCache<any> } = {}; private cachedValue?: T; private cachedObservable: Observable<T>; constructor(private cacheKey: string, observable: Observable<T>) { InMemoryCache.sharedCache[this.cacheKey] = this; this.cachedObservable = new Observable<T>(subscriber => { observable.subscribe({ error: (error) => subscriber.error(error), next: (value: T) => { this.cachedValue = value; subscriber.next(value); subscriber.complete(); } }); }); } get observable(): Observable<T> { return this.cachedValue ? of(this.cachedValue) : this.cachedObservable; } static putCache<V>(cacheKey: string, observable: Observable<V>): InMemoryCache<V> { return (new InMemoryCache<V>(cacheKey, observable)); } static getCache<V>(cacheKey: string): InMemoryCache<V> { return InMemoryCache.sharedCache[cacheKey] as InMemoryCache<V>; } static hasCache(cacheKey: string): boolean { return !!InMemoryCache.getCache(cacheKey); } }
Cart Service
src/app/services/cart.service.ts(simplified):import { Injectable } from '@angular/core'; import { HttpClient } from '@angular/common/http'; import { Observable, zip } from 'rxjs'; import { CartItem } from '../models/cart.model'; import { Product } from '../models/product.model'; import { ProductService } from './product.service'; @Injectable({ providedIn: 'root' }) export class CartService { constructor( private http: HttpClient, private api: ProductService ) { } getCartItem() { return this.http.get<CartItem[]>('/api/cart'); } updateCart(item: CartItem) { return this.http.post<CartItem[]>('/api/cart/update', item); } ... }
src/app/services/cart.service.ts(my complete implementation):import { Injectable } from '@angular/core'; import { HttpClient } from '@angular/common/http'; import { Observable, zip } from 'rxjs'; import { CartItem, } from '../models/cart.model'; import { Product } from '../models/product.model'; import { ProductService } from './product.service'; @Injectable({ providedIn: 'root' }) export class CartService { constructor( private http: HttpClient, private api: ProductService ) { } getCartItem() { return this.http.get<CartItem[]>('/api/cart'); } /** * This combines the cart items with the corresponding Product objects. For * each cart item, retrieves the associated Product object and assigns it to * the CartItem's optional product property. * * @returns * Items in the Cart via an Observable. */ getCart() { return new Observable<CartItem[]>((subscriber) => { this.getCartItem().subscribe((items) => { zip(items.map(item => this.api.getProductById(item.id))).subscribe((products) => { subscriber.next(items.map((item, i) => { item.product = products[i]; return item; })); subscriber.complete(); }); }); }); } /** * This is the overloaded version of updateCart. Takes either a CartItem or a * Product and sends a POST request with the optional given qty to the backend * service or 1 if a Product is given as the item argument or the CartItem's * existing qty if a CartItem is given as the item argument. * * @param item A cart item or the product to add to the cart. * @param qty The quantity to update the item in the cart to. * @returns The updated array of items within the Cart via an Observable. */ updateCart(item: CartItem | Product, qty?: number): Observable<CartItem[]> { const url = '/api/cart/update'; if ((item as Product).name) { // item must be a Product return this.http.post<CartItem[]>(url, { id: item.id, qty: qty ?? 1 }); } else { // item is a CartItem return this.http.post<CartItem[]>(url, { id: item.id, qty: qty ?? item.qty }); } } /** * Add the given Product to the cart with the given qty or 1. * * @param product The product to add to the cart. * @param qty The quantity of the Product to add to the Cart * @returns The updated array of items within the Cart via an Observable. */ addToCart(product: Product, qty: number = 1) { return new Observable<CartItem[]>((subscriber) => { this.getCartItem().subscribe((items) => { const item = items.find(it => it.id === product.id); const updater = this.updateCart(item ?? product, item ? item.qty + qty : qty); updater.subscribe((updated) => { subscriber.next(updated); subscriber.complete(); }); }); }); } }
From Promises to Observables
An
Observableis like aStream(in many languages) and allows to pass zero or more events where the callback is called for each event. OftenObservableis preferred overPromisebecause it provides the features ofPromiseand more. WithObservableit doesn’t matter if you want to handle 0, 1, or multiple events. You can utilize the same API in each case. Whereas, aPromisehandles a single event when an async operation completes or fails.
Observablealso has the advantage overPromiseto be cancellable. If the result of an HTTP request to a server or some other expensive async operation isn’t needed anymore, theSubscriptionof anObservableallows to cancel the subscription, while aPromisewill eventually call the success or failed callback even when you don’t need the notification or the result it provides anymore.While a
Promisestarts immediately, anObservableonly starts if you subscribe to it. This is whyObservablesare calledlazy.Observableprovides operators likemap,forEach,reduce, etc. similar to an array. There are also powerful operators likeretry(), orreplay()that are often quite handy. Lazy execution allows to build up a chain of operators before the observable is executed by subscribing, to do a more declarative kind of programming.Handling a Promise and handling an Observable
promise.then( (result) => { ... }, // when fulfilled (error) => { ... } // when rejected );observable.subscribe({ next: (result) => { ... }, error: (error) => { ... }, complete: () => { ... } });Creating a Promise and creating an Observable
const promise = new Promise((resolve, reject) => {
  ... resolve(result);  // when fullfilled
  ... reject(error);    // when rejected
  ...
});
const observable = new Observable((subscriber) => { ... subscriber.then(result); // when new result available ... subscriber.error(error); // when rejected ... subscriber.complete(); // when end, no more results ... });Promise.all and Observable.zip
Promise.all(arrayOfPromises).then((results) => { ... });import { zip } from 'rxjs'; zip(arrayOfObservables).subscribe((results) => { ... });
The App Root — AppComponent
import { Component } from '@angular/core';

@Component({
  selector: 'app-root',
  styles: [],
  template: `
    <app-navbar></app-navbar>
    <div id="page" class="container-lg container-fluid mt-4">
      <router-outlet></router-outlet>
    </div>
  `
})
export class AppComponent { }
In All Views
Each view has an unique title that is displayed in the browser’s tab or used to identify it in the browser’s history. To change the title dynamically within Angular, we can use the Title class in the @angular/platform-browser module, like this:
this.title.setTitle('Models R US');
Despite Angular routing a user to a view, doesn’t mean that that view is validate, i.e.: the corresponding product or category might not exist. In such case, we need to redirect the user back to the default view. In other cases, we might want to navigate to a different view dynamically within our TypeScript code. To do this, use the Router class within the @angular/router module and use its navigate method like this:
this.router.navigate(['/cart']);
In the markup, we can also use the routerLink attribute, as follows:
<a routerLink="/cart">Cart</a>
The Catalog View
Use *ngFor to loop through each category to display a CategoryCardComponent for each category, like this:
<app-category-card
  *ngFor="let category of categories"
  [category]="category"
  [routerLink]="'/category/' + category.id">
</app-category-card>
This replaces the {{ content }} in the catalog-page template from Project D. The CategoryCardComponent component takes the input values: category and display the category’s name and its associated image. Note: The [routerLink] attribute here, routes users to the each category’s view when the category card is clicked. (This simplified implementation replaces an older implementation that toggled between routing to category views or routing to the Catalog view with the isBackButton boolean).
The Category and Product Views
Both the /category/:catId and /products/:prodId routes use the CategoryViewComponent component. The ProductDetailsComponent is a child component of the CategoryViewComponent component. Use the ActivatedRoute class in the @angular/router module to determine whether or not to display as the Category view or as the Product view. Do this within the ngOnInit() Angular lifecycle method.
ngOnInit(): void {
  this.route.paramMap.subscribe((params) => {
    if (params.has('catId')) {
      this.showCategory(+params.get('catId')!);
    } else if (params.has('prodId')) {
      this.showProduct(params.get('prodId')!); // assign product to this.selected
    } else {
      this.router.navigate(['/']);
    }
  });
}
You will need to implement the showCategory and showProduct methods. The showProduct method will retrieve the Product by ID from the API service and then call the showCategory method. While showCategory method retrieves the Category by ID and then the Products by Category. If the Product ID or the Category ID doesn’t exist, redirect the user to the default view, like this:
showCategory(catId: number) {
  this.api.getCategoryById(catId).subscribe({
    next: (category) => {
      ...
    },
    error: (error) => {
      this.router.navigate(['/']);
    }
  });
}
Same for the showProduct method.
Additionally, this is where you can set the title in the browser using Title service’s setTitle method. In your showCategory method, you can test for whether a Product is assigned to this.selected to determine to change the title to the Category’s name or the Product’s name, like this:
this.title.setTitle(this.selected ? this.selected.name : category.name);
Make sure to replace the {{ content }} in the category-page template from Project D with a *ngFor loop of the contents from the product-card template from Project D, like this:
<a class="list-group-item list-group-item-action product-card"
  *ngFor="let product of products"
  [ngClass]="{'active': selected && product.id === selected.id }"
  [routerLink]="'/products/' + product.id">
  {{ product.name }}
</a>
Also replace the {{ title }} in the category-page template from Project D with the CategoryCardComponent:
<div *ngIf="category">
  <app-category-card [category]="category" routerLink="/"></app-category-card>
</div>
Note: The *ngIf condition prevents an error from being thrown before the API service returns the Category object to the component.
ProductDetailsComponent
<app-product-details [product]="selected"></app-product-details>
For the ProductDetailsComponent, use ngIf and <ng-template> to determine whether to show the selected Product or a message to the user to ‘Select a product’ if none is selected. Like this:
<ng-template [ngIf]="product" [ngIfElse]="noProduct">
  <!-- The 'product-page' template from Project D goes here -->
</ng-template>
<ng-template #noProduct>
  <div class="card">
    <div class="card-body">
      <p class="card-text text-center">Select a product</p>
    </div>
  </div>
</ng-template>
The Cart View
In the Cart view, use *ngFor to display each row within the Cart table. Use Template-driven Forms to two-way binding the quantity values within the input fields and the item.qty in the cart. Like this:
<tr *ngFor="let item of items"> ...
  <!-- 'cart-row' template from Project D goes here -->
  ...
  <td><input type="text" class="qty-input form-control" [(ngModel)]="item.qty"
             (ngModelChange)="qtyAsNumber(item)" /></td>
  <td><button type="button" tabindex="0"
              class="update-cart btn btn-primary"
              (click)="updateCart(item)">Update</button></td>
</tr>
This replaces the {{ content }} in the cart-page template from Project D. In your CartViewComponent, you will need to implement the qtyAsNumber and updateCart methods. The (ngModelChange) event is fired every time the input field’s ngModel is change. We use this to ensure that item.qty is always a number.
qtyAsNumber(item: CartItem) {
  item.qty = item.qty ? +item.qty : 0;
}
For the back button, use the Location class in the @angular/common module to navigate back.
<!-- In Project D -->
<a href="javascript:history.back();" class="fw-lighter text-dark text-decoration-none"> ... </a>
<!-- In Project E -->
<a (click)="goBack()" class="back-btn fw-lighter text-dark text-decoration-none"> ... </a>
goBack() {
  this.location.back();
}
The Frontend — Part 2
Your second task is to implement three additional views: ShipTo, Checkout and Finish and refactor the Cart view to share its cart table with the Checkout view.
$ ng generate component components/ship-to-view
$ ng generate component components/checkout-view
$ ng generate component components/finish-view
$ ng generate component components/cart-table
Updated AppModule
Your updated
app.module.tsshould look something like this:import { NgModule } from '@angular/core'; import { BrowserModule, Title } from '@angular/platform-browser'; import { HttpClientModule } from '@angular/common/http'; import { RouterModule } from '@angular/router'; import { FormsModule, ReactiveFormsModule } from '@angular/forms'; import { AppComponent } from './app.component'; import { NavbarComponent } from './components/navbar/navbar.component'; import { CatalogViewComponent } from './components/catalog-view/catalog-view.component'; import { CategoryCardComponent } from './components/category-card/category-card.component'; import { CategoryViewComponent } from './components/category-view/category-view.component'; import { ProductDetailsComponent } from './components/product-details/product-details.component'; import { CartViewComponent } from './components/cart-view/cart-view.component'; import { ShipToViewComponent } from './components/ship-to-view/ship-to-view.component'; import { CheckoutViewComponent } from './components/checkout-view/checkout-view.component'; import { FinishViewComponent } from './components/finish-view/finish-view.component'; import { CartTableComponent } from './components/cart-table/cart-table.component'; @NgModule({ imports: [ BrowserModule, HttpClientModule, FormsModule, // template-driven forms ReactiveFormsModule, // model-driven (reactive) forms RouterModule.forRoot([ { path: 'catalog', component: CatalogViewComponent }, { path: 'category/:catId', component: CategoryViewComponent }, { path: 'products/:prodId', component: CategoryViewComponent }, { path: 'cart', component: CartViewComponent }, { path: 'shipTo', component: ShipToViewComponent }, { path: 'checkout', component: CheckoutViewComponent }, { path: 'finish', component: FinishViewComponent }, { path: '', pathMatch: 'full', redirectTo: '/catalog' }, { path: '**', pathMatch: 'full', redirectTo: '/catalog' }, ]) ], bootstrap: [AppComponent], providers: [ Title ], declarations: [ AppComponent, NavbarComponent, CatalogViewComponent, CategoryCardComponent, CategoryViewComponent, ProductDetailsComponent, CartViewComponent, ShipToViewComponent, CheckoutViewComponent, FinishViewComponent, CartTableComponent ] }) export class AppModule { }
For a reference implementation, see: here.
The ShipTo View
This view has a header at the top that says “Shipping Address” along with the title on the browser tab. To the left of the header is a back button, like the one in the Cart view to navigate back to the previous view, cancelling any changes in the form. In the view, a form is displayed to allow the user to enter the following fields:
- Recipient Name
- Street Address 1
- Street Address 2
- City
- Province/State
- Postal/Zip Code
- Delivery Method
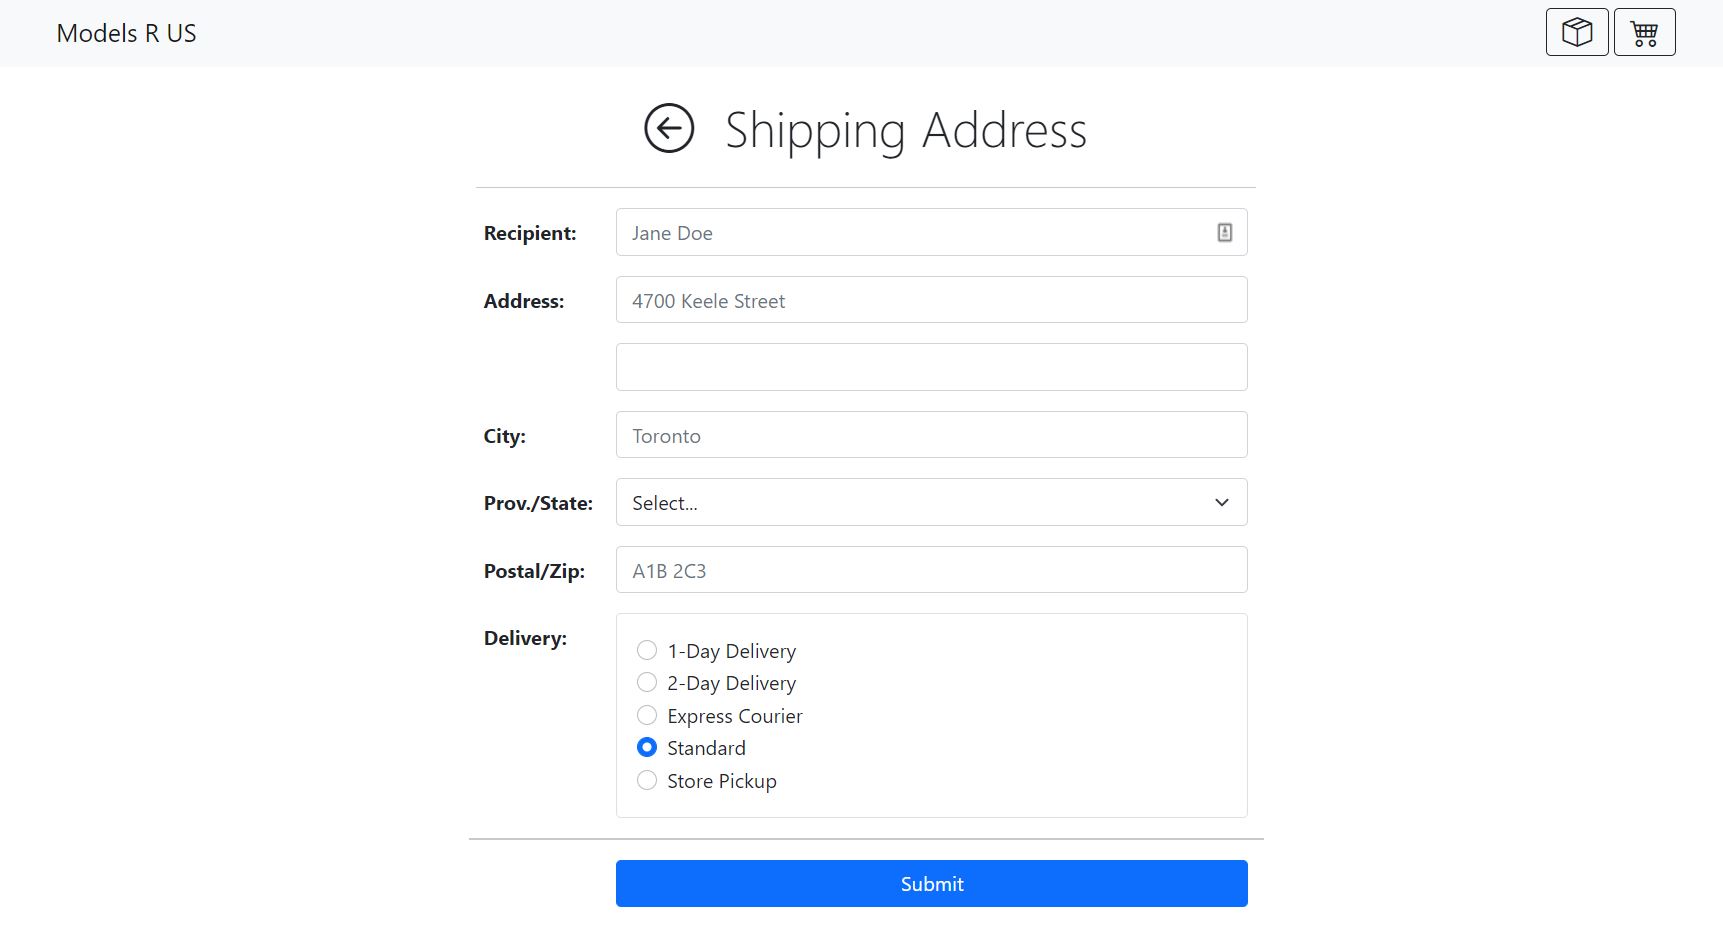
A button with caption “Submit” must appear under the form. The button does nothing if the entries are not valid. Validation involves ensuring that all fields (aside from the second street address and the instructions) are not left empty. (You can optionally further validate that the Postal/Zip code field matches the expected regular expression for Canadian/US codes but this is not required for this project.) If the entries are valid then pressing the button displays the view that was displayed before ShipTo. Note that this button controls validation and inter-view navigation but it does not invoke any backend service when clicked—the entered information remains in the frontend at the client end.
ShipTo View Component — The Raw HTML
Here’s the HTML for
ShipToViewComponent. Convert this into an Angular template.<div id="ship-to" class="container-lg container-fluid"> <div class="row align-items-start"> <div class="col col-lg-6 offset-lg-3"> <h1 class="display-6 text-center"> <!-- replace `href="javascript:history.back();"` with `(click)="goBack()"` --> <a href="javascript:history.back();" class="back-btn fw-lighter text-dark text-decoration-none"><i class="bi bi-arrow-left-circle"></i></a> <span class="ms-4">Shipping Address</span> </h1> <hr class="mt-4"> </div> </div> <form class="container"> <!-- Add [formGroup] and (ngSubmit) here --> <div class="row align-items-start"> <div class="col col-lg-6 offset-lg-3"> <div class="mb-3 row"> <label id="recipient-label" for="recipient" class="col-sm-2 col-form-label fw-bold">Recipient:</label> <div class="col-sm-10"><input type="text" name="recipient" required class="form-control" placeholder="Jane Doe"></div> </div> <div class="mb-3 row"> <label id="streetAddress-label" for="streetAddress" class="col-sm-2 col-form-label fw-bold">Address:</label> <div class="col-sm-10"><input type="text" name="streetAddress" required class="form-control" placeholder="4700 Keele Street"></div> </div> <div class="mb-3 row"> <div class="col-sm-10 offset-sm-2"> <input type="text" name="streetAddress2" class="form-control" placeholder=""> </div> </div> <div class="mb-3 row"> <label id="city-label" for="city" class="col-sm-2 col-form-label fw-bold">City:</label> <div class="col-sm-10"><input type="text" name="city" required class="form-control" placeholder="Toronto"></div> </div> <div class="mb-3 row"> <label id="province-label" for="province" class="col-sm-2 col-form-label fw-bold">Prov./State:</label> <div class="col-sm-10"> <select name="province" required class="form-select"> <option value="" disabled hidden selected>Select...</option> <optgroup label="Canada"> <!-- Convert this into a *ngFor loop --> <option>AB - Alberta</option> <option>BC - British Columbia</option> <option>MB - Manitoba</option> <option>NB - New Brunswick</option> <option>NL - Newfoundland and Labrador</option> <option>NS - Nova Scotia</option> <option>ON - Ontario</option> <option>PE - Prince Edward Island</option> <option>QC - Quebec</option> <option>SK - Saskatchewan</option> <option>NT - Northwest Territories</option> <option>NU - Nunavut</option> <option>YT - Yukon</option> </optgroup> <optgroup label="United States"> <!-- Convert this into a *ngFor loop --> <option>AL - Alabama</option> <option>AK - Alaska</option> <option>AZ - Arizona</option> <option>AR - Arkansas</option> <option>CA - California</option> <option>CO - Colorado</option> <option>CT - Connecticut</option> <option>DE - Delaware</option> <option>FL - Florida</option> <option>GA - Georgia</option> <option>HI - Hawaii</option> <option>ID - Idaho</option> <option>IL - Illinois</option> <option>IN - Indiana</option> <option>IA - Iowa</option> <option>KS - Kansas</option> <option>KY - Kentucky</option> <option>LA - Louisiana</option> <option>ME - Maine</option> <option>MD - Maryland</option> <option>MA - Massachusetts</option> <option>MI - Michigan</option> <option>MN - Minnesota</option> <option>MS - Mississippi</option> <option>MO - Missouri</option> <option>MT - Montana</option> <option>NE - Nebraska</option> <option>NV - Nevada</option> <option>NH - New Hampshire</option> <option>NJ - New Jersey</option> <option>NM - New Mexico</option> <option>NY - New York</option> <option>NC - North Carolina</option> <option>ND - North Dakota</option> <option>OH - Ohio</option> <option>OK - Oklahoma</option> <option>OR - Oregon</option> <option>PA - Pennsylvania</option> <option>RI - Rhode Island</option> <option>SC - South Carolina</option> <option>SD - South Dakota</option> <option>TN - Tennessee</option> <option>TX - Texas</option> <option>UT - Utah</option> <option>VT - Vermont</option> <option>VA - Virginia</option> <option>WA - Washington</option> <option>WV - West Virginia</option> <option>WI - Wisconsin</option> <option>WY - Wyoming</option> <option>DC - District of Columbia</option> <option>AS - American Samoa</option> <option>GU - Guam</option> <option>MP - Northern Mariana Islands</option> <option>PR - Puerto Rico</option> <option>VI - U.S. Virgin Islands</option> </optgroup> </select> </div> </div> <div class="mb-3 row"> <label id="postalCode-label" for="postalCode" class="col-sm-2 col-form-label fw-bold">Postal/Zip:</label> <div class="col-sm-10"><input type="text" name="postalCode" required class="form-control" placeholder="A1B 2C3"></div> </div> <div class="mb-3 row"> <label id="delivery-label" for="delivery" class="col-sm-2 col-form-label fw-bold">Delivery:</label> <div class="col-sm-10"> <div class="card"><div class="card-body"> <div class="form-check"> <!-- Convert these into a *ngFor loop --> <input id="delivery-0" name="delivery" type="radio" class="form-check-input"> <label id="delivery-0-label" for="delivery-0" class="form-check-label">1-Day Delivery</label> <input id="delivery-1" name="delivery" type="radio" class="form-check-input"> <label id="delivery-1-label" for="delivery-1" class="form-check-label">2-Day Delivery</label> <input id="delivery-2" name="delivery" type="radio" class="form-check-input"> <label id="delivery-2-label" for="delivery-2" class="form-check-label">Express Courier</label> <input id="delivery-3" name="delivery" type="radio" class="form-check-input"> <label id="delivery-3-label" for="delivery-3" class="form-check-label">Standard</label> <input id="delivery-4" name="delivery" type="radio" class="form-check-input"> <label id="delivery-4-label" for="delivery-4" class="form-check-label">Store Pickup</label> </div> </div></div> </div> </div> <div class="mb-3 row"><hr> <div class="col-sm-10 offset-sm-2 d-grid"> <button class="btn btn-primary" type="submit">Submit</button> </div> </div> </div> </div> </form> </div>
Each
<option>elements within the<select>element should each have an[ngValue]attribute and be converted into*ngForloops. Within your component class, declare two arrays, one to hold the Canadian provinces and territories and the other to hold the US states and its territories. Like this:<select name="province" formControlName="province" required class="form-select" [ngClass]="{'is-invalid': invalidInput('province'), 'is-valid': validInput('province')}"> <option [ngValue]="null" disabled hidden selected>Select...</option> <optgroup label="Canada"> <option *ngFor="let province of CanadianProvincesAndTerritories" [ngValue]="province"> {{ province.code }} - {{ province.name }} </option> </optgroup> <optgroup label="United States"> <option *ngFor="let state of USStatesAndTerritories" [ngValue]="state"> {{ state.code }} - {{ state.name }} </option> </optgroup> </select>CanadianProvincesAndTerritories = [ { code: "AB", name: "Alberta" }, ... ]; USStatesAndTerritories = [ { code: "AL", name: "Alabama" }, ... ];One problem with this approach is: each time the view reloads, Angular needs to match the selected province to province objects in the array. However, the component is recreated each time the component is viewed, the instance variables are destroyed and repopulated. Thus, the selected province object no longer matches the objects in the array. To fix, we either make the arrays
staticvariables in our class or we move them to a separate model class. I opted for the second option:CanadianProvincesAndTerritories = ShippingConstants.CanadianProvincesAndTerritories; USStatesAndTerritories = ShippingConstants.USStatesAndTerritories;More on
ShippingConstantshere.
Likewise for the
deliveryfield of radio buttons, declare an array of strings and then use a*ngForloop to create a radio button and label for each. Like this:DeliveryMethods = [ '1-Day Delivery', '2-Day Delivery', 'Express Courier', 'Standard', 'Store Pickup', ];<div class="form-check" *ngFor="let method of DeliveryMethods; let i = index"> <input type="radio" id="delivery-{{ i }}" name="delivery" formControlName="delivery" [value]="method" class="form-check-input"> <label for="delivery-{{ i }}" id="delivery-{{ i }}-label" class="form-check-label">{{ method }}</label> </div>
For the back button, like in the
CartViewComponent, use theLocationclass in the@angular/commonmodule to navigate back.<!-- In Project D --> <a href="javascript:history.back();" class="back-btn ..."> ... </a><!-- In Project E --> <a (click)="goBack()" class="back-btn ..."> ... </a>goBack() { this.location.back(); }
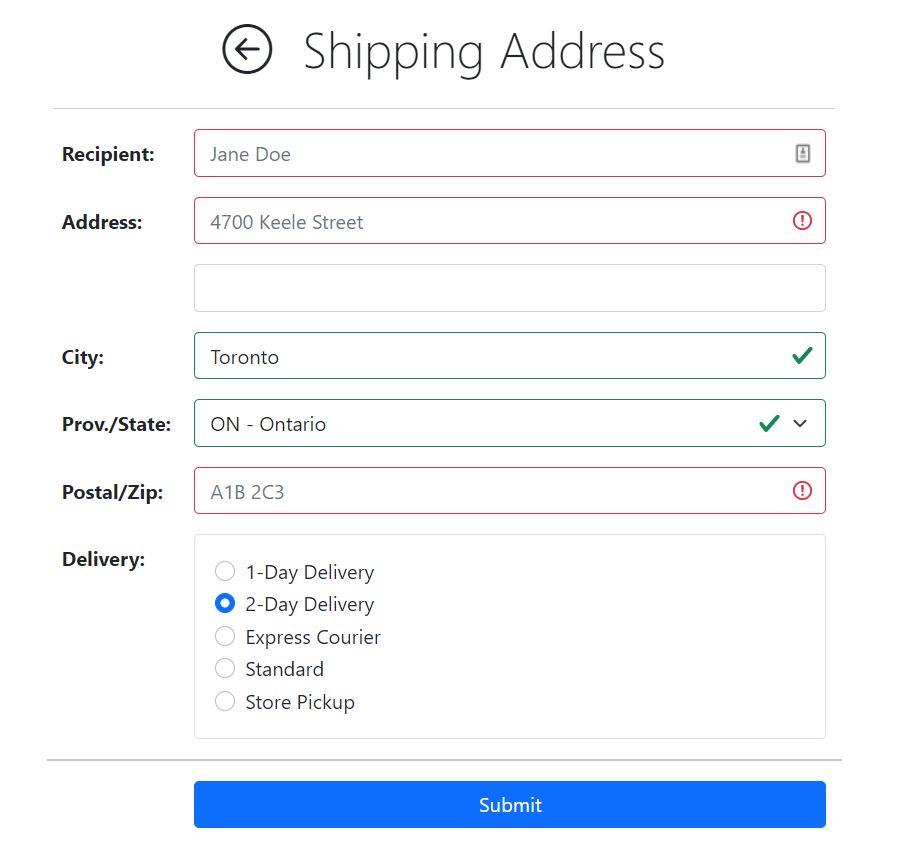
Creating and validating the Form
Use the Reactive Forms API instead of the template-driven forms like in the Cart view.
In your component, you need to create the Reactive Form model. Use
FormBuilder, like this:shippingAddress = this.fb.group({ recipient: ['', Validators.required], streetAddress: ['', Validators.required], streetAddress2: [''], city: ['', Validators.required], province: [null, Validators.required], postalCode: ['', Validators.required], delivery: ['Standard'] }); constructor(private fb: FormBuilder, ...) { }The
<form>element should have[formGroup]and(ngSubmit)added to it, like this:<form [formGroup]="shippingAddress" (ngSubmit)="onSubmit()" class="container"> ... </form>Each of the
nameattributes for the<input>or<select>elements within the form should have a correspondingformControlNameattribute added. Each of the required form controls should have a[ngClass]attribute added, like this:<input type="text" name="recipient" formControlName="recipient" required class="form-control" placeholder="Jane Doe" [ngClass]="{'is-invalid': invalidInput('recipient'), 'is-valid': validInput('recipient')}">
invalidInputandvalidInputare methods within the Component that take the name of the form control and returns a boolean determining whether the field is valid or not.invalidInputandvalidInput:invalidInput(input: string): boolean { if (this.formSubmitted) { // boolean set to true when the submit is clicked return this.shippingAddress.get(input)!.invalid; } else { return false; } } validInput(input: string): boolean { if (this.shippingAddress.touched || this.shippingAddress.dirty) { return this.shippingAddress.get(input)!.valid; } else { return false; } }Since we added
(ngSubmit)="onSubmit()"to the<form>element, we need implement anonSubmitmethod. Like this:onSubmit() { this.formSubmitted = true; if (this.shippingAddress.valid) { this.shipping.shippingAddress = this.shippingAddress.value; // More on this later this.goBack(); } }
Shared Shipping Service
Because the
CheckoutViewComponentneeds access to the form’s values within theShipToViewComponent, we need to create a shared service between these two components. To do this, we create ourselves a model of theShippinginterface and a simpleShippingServiceservice:
src/app/models/shipping.model.ts:export interface Province { code: string; name: string; } export interface Shipping { recipient: string; streetAddress: string; streetAddress2: string; city: string; province: Province; postalCode: string; delivery: string; } export class ShippingConstants { static CanadianProvincesAndTerritories: Province[] = [ { code: "AB", name: "Alberta" }, { code: "BC", name: "British Columbia" }, { code: "MB", name: "Manitoba" }, { code: "NB", name: "New Brunswick" }, { code: "NL", name: "Newfoundland and Labrador" }, { code: "NS", name: "Nova Scotia" }, { code: "ON", name: "Ontario" }, { code: "PE", name: "Prince Edward Island" }, { code: "QC", name: "Quebec" }, { code: "SK", name: "Saskatchewan" }, { code: "NT", name: "Northwest Territories" }, { code: "NU", name: "Nunavut" }, { code: "YT", name: "Yukon" }, ]; static USStatesAndTerritories: Province[] = [ { code: "AL", name: "Alabama" }, { code: "AK", name: "Alaska" }, { code: "AZ", name: "Arizona" }, { code: "AR", name: "Arkansas" }, { code: "CA", name: "California" }, { code: "CO", name: "Colorado" }, { code: "CT", name: "Connecticut" }, { code: "DE", name: "Delaware" }, { code: "FL", name: "Florida" }, { code: "GA", name: "Georgia" }, { code: "HI", name: "Hawaii" }, { code: "ID", name: "Idaho" }, { code: "IL", name: "Illinois" }, { code: "IN", name: "Indiana" }, { code: "IA", name: "Iowa" }, { code: "KS", name: "Kansas" }, { code: "KY", name: "Kentucky" }, { code: "LA", name: "Louisiana" }, { code: "ME", name: "Maine" }, { code: "MD", name: "Maryland" }, { code: "MA", name: "Massachusetts" }, { code: "MI", name: "Michigan" }, { code: "MN", name: "Minnesota" }, { code: "MS", name: "Mississippi" }, { code: "MO", name: "Missouri" }, { code: "MT", name: "Montana" }, { code: "NE", name: "Nebraska" }, { code: "NV", name: "Nevada" }, { code: "NH", name: "New Hampshire" }, { code: "NJ", name: "New Jersey" }, { code: "NM", name: "New Mexico" }, { code: "NY", name: "New York" }, { code: "NC", name: "North Carolina" }, { code: "ND", name: "North Dakota" }, { code: "OH", name: "Ohio" }, { code: "OK", name: "Oklahoma" }, { code: "OR", name: "Oregon" }, { code: "PA", name: "Pennsylvania" }, { code: "RI", name: "Rhode Island" }, { code: "SC", name: "South Carolina" }, { code: "SD", name: "South Dakota" }, { code: "TN", name: "Tennessee" }, { code: "TX", name: "Texas" }, { code: "UT", name: "Utah" }, { code: "VT", name: "Vermont" }, { code: "VA", name: "Virginia" }, { code: "WA", name: "Washington" }, { code: "WV", name: "West Virginia" }, { code: "WI", name: "Wisconsin" }, { code: "WY", name: "Wyoming" }, { code: "DC", name: "District of Columbia" }, { code: "AS", name: "American Samoa" }, { code: "GU", name: "Guam" }, { code: "MP", name: "Northern Mariana Islands" }, { code: "PR", name: "Puerto Rico" }, { code: "VI", name: "U.S. Virgin Islands" }, ]; static DeliveryMethods = [ '1-Day Delivery', '2-Day Delivery', 'Express Courier', 'Standard', 'Store Pickup', ]; }
src/app/services/shipping.service.ts:import { Injectable } from '@angular/core'; import { Shipping } from '../models/shipping.model'; @Injectable({ providedIn: 'root' }) export class ShippingService { shippingAddress?: Shipping; }
In
ShipToViewComponent:shippingAddress = this.fb.group({ ... }); constructor( private fb: FormBuilder, private shipping: ShippingService, ... ) { } onSubmit() { this.formSubmitted = true; if (this.shippingAddress.valid) { this.shipping.shippingAddress = this.shippingAddress.value; // Here this.goBack(); } }Whenever you return to the
ShipToViewComponent, it should show you the shipping address that you already entered previously. To do this, we update thengOnInitto populate the form if theShippingService’sshippingAddressattribute is defined. Like this;ngOnInit(): void { this.title.setTitle('Ship To'); if (this.shipping.shippingAddress) { this.shippingAddress.setValue(this.shipping.shippingAddress); } }
In
CheckoutViewComponent:constructor( private location: Location, private title: Title, private router: Router, private shipping: ShippingService, ... ) { } ngOnInit(): void { this.title.setTitle('Checkout'); if (!this.shipping.shippingAddress) { this.router.navigate(['/shipTo'], { replaceUrl: true }); } } get shippingAddress() { return this.shipping.shippingAddress; }<div class="col col-lg-3" *ngIf="shippingAddress"> <div class="card"> <div class="card-header text-white bg-primary">Shipping Address</div> <div class="card-body"> <p class="card-text"> <b>{{ shippingAddress.recipient }}</b><br> {{ shippingAddress.streetAddress }}<br> <span *ngIf="shippingAddress.streetAddress2">{{ shippingAddress.streetAddress2 }}<br></span> {{ shippingAddress.city }}, {{ shippingAddress.province.code }}<br> {{ shippingAddress.postalCode }} </p> </div> <div class="card-footer"> {{ shippingAddress.delivery }} </div> </div> </div>
Form Validation for Postal & Zip Codes (Optional)
You can optionally further validate that the Postal/Zip code field matches the expected regular expression for Canadian/US codes but this is not required for this project. Here’s how I did it. My validation rules are
- If a
provinceis not selected, match both Canadian and US Postal/Zip codes.- If a Canadian province or territory is selected, match only Canadian Postal codes.
- Otherwise, match only US Zip codes.
Here are the Regular expressions:
PostalCodeRegEx = /^[ABCEGHJKLMNPRSTVXY][0-9][ABCEGHJKLMNPRSTVWXYZ] ?[0-9][ABCEGHJKLMNPRSTVWXYZ][0-9]$/i;
ZipCodeRegEx    = /^[0-9]{5}(?:[-\s][0-9]{4})?$/;
Next, I implemented a custom validator, like this:
validatePostalOrZipCode(fc: FormControl) {
  return (this.PostalCodeRegEx.test(fc.value) || this.ZipCodeRegEx.test(fc.value)) ? null : {
    validInput: {
      valid: false
    }
  };
}
And updated the
shippingAddressform model. Note:bind(this)is necessary to ensure that the keywordthiswithin thevalidatePostalOrZipCodemethod refers tothisinstance of theShipToViewComponentwhen the method is executed.shippingAddress = this.fb.group({ recipient: ['', Validators.required], streetAddress: ['', Validators.required], streetAddress2: [''], city: ['', Validators.required], province: [null, Validators.required], postalCode: ['', [Validators.required, this.validatePostalOrZipCode.bind(this)]], delivery: ['Standard'] });Since, my validation rules change depending on the value of the
provincefield, I need to track the changes to theprovinceform field and change the validator accordingly. I do that, like this:ngOnInit() { ... this.shippingAddress.get('province')!.valueChanges.subscribe((province?: Province) => { const postalCode = this.shippingAddress.get('postalCode')!; const validator = this.getPostalCodeValidator(province); postalCode.setValidators([Validators.required, validator]); postalCode.updateValueAndValidity(); }); } getPostalCodeValidator(province?: Province) { if (!province) { return this.validatePostalOrZipCode.bind(this) as ValidatorFn; } return this.CanadianProvincesAndTerritories.includes(province) ? Validators.pattern(this.PostalCodeRegEx) : Validators.pattern(this.ZipCodeRegEx); }
The Checkout View
This view has a header at the top that says “Order Details” along with the title on the browser tab. In this view, all the following details must be displayed in a read-only fashion:
- The shipping address.
- The cart per product: the product name, quantity, unit price, and subtotals (= quantity * unit price).
- The total price of the cart (= the sum of all subtotals).
Two buttons must appear at the bottom with captions “Continue Shopping” and “Checkout”. If the former is clicked then the Catalog view is displayed; and if the latter is clicked then the user is shown the Finish view.
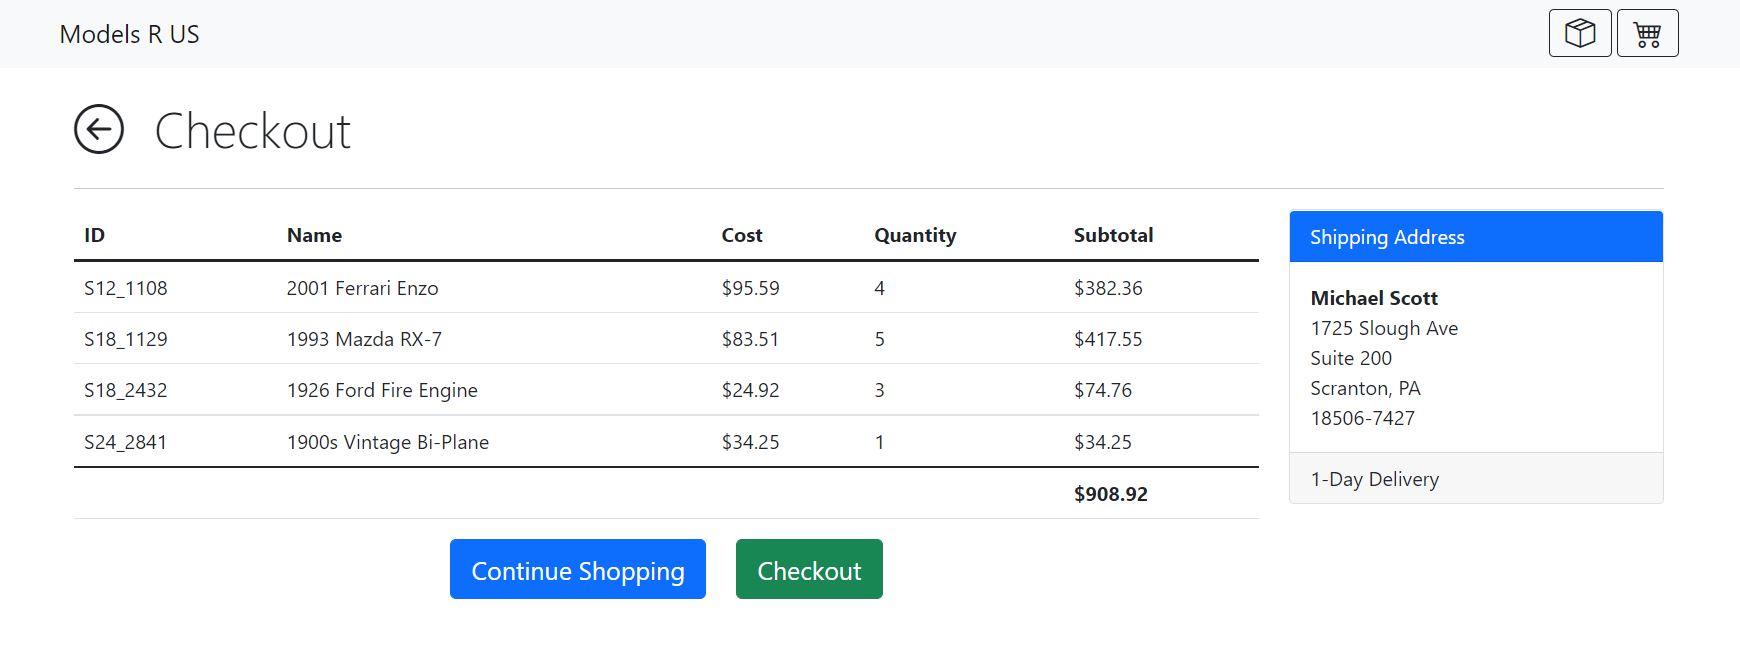
Checkout View Component — The Raw HTML
Here’s the HTML for
CheckoutViewComponent. Convert this into an Angular template.<div id="checkout" class="container-lg container-fluid"> <div class="row align-items-start"> <div class="col"> <h1 class="display-6"> <!-- replace `href="javascript:history.back();"` with `(click)="goBack()"` --> <a href="javascript:history.back();" class="back-btn fw-lighter text-dark text-decoration-none"><i class="bi bi-arrow-left-circle"></i></a> <span class="ms-4">Checkout</span> </h1> <hr class="mt-4"> </div> </div> <div class="row align-items-start"> <div class="col col-lg-9"> <!-- The cart table goes here --> </div> <div class="col col-lg-3"> <div class="card"> <div class="card-header text-white bg-primary">Shipping Address</div> <div class="card-body"> <p class="card-text"> <!-- replace these with the appropriate fields --> <b>Recipient Name</b><br> 123 Street Address Line 1<br> <span>Suite 456, Street Address Line 2<br></span> Toronto, ON<br> A1B 2C3 </p> </div> <div class="card-footer"> Delivery Method <!-- replace this --> </div> </div> </div> </div> <div class="row align-items-start"> <div class="col col-lg-9 text-center"> <button class="btn btn-primary btn-lg">Continue Shopping</button><!-- goto: /catalog --> <button class="btn btn-success btn-lg ms-4">Checkout</button><!-- goto: /finish --> </div> </div> </div>
Spinning Off the Cart table into its own Component
Both the
CartViewComponentandCheckoutViewComponentshow the items within the Cart. Instead of having different implementations of the Cart table, let’s refactor our templates and components so thatCartViewComponentandCheckoutViewComponentshare the sameCartTableComponent.Here is the template for the
CartTableComponent:<table id="cart-table" class="table"> <thead> <tr> <th scope="col">ID</th> <th scope="col">Name</th> <th scope="col">Cost</th> <th scope="col">Quantity</th> <th scope="col">Subtotal</th> <th scope="col" *ngIf="updatable">Update</th> </tr> </thead> <tbody class="table-hover"> <tr *ngFor="let item of items"> <td scope="row">{{ item.id }}</td> <td>{{ item.product!.name }}</td> <td>{{ item.product!.cost | currency }}</td> <td> <ng-template [ngIf]="updatable" [ngIfElse]="notUpdatable"> <input type="text" class="qty-input form-control" [(ngModel)]="item.qty" (ngModelChange)="qtyAsNumber(item)"> </ng-template> <ng-template #notUpdatable> {{ item.qty }} </ng-template> </td> <td>{{ item.product!.cost * item.qty | currency }}</td> <td *ngIf="updatable"> <button type="button" tabindex="0" class="update-cart btn btn-primary" (click)="updateCart(item)">Update</button> </td> </tr> </tbody> <tfoot> <tr> <th scope="col"></th> <th scope="col"></th> <th scope="col"></th> <th scope="col"></th> <th scope="col">{{ total | currency }}</th> <th scope="col" *ngIf="updatable"></th> </tr> </tfoot> </table>Notice the
updatablevariable. This is a boolean that will allow us to distinguish between the Update-able cart table in theCartViewComponentversus the readonly cart table in theCheckoutViewComponent. Make sure to declare this within yourCartTableComponentclass with the@Input()decorator. Like this:@Input() updatable: boolean = false;
In the
CartViewComponent, replace the entire<table id="cart-table"> ... </table>with this:<app-cart-table [updatable]="true"></app-cart-table>And then, move the following code from the
CartViewComponentto theCartTableComponent:items: CartItem[] = []; constructor(private cart: CartService) { } ngOnInit(): void { this.cart.getCart().subscribe((items) => { this.items = items; }); } qtyAsNumber(item: CartItem) { item.qty = +item.qty; } updateCart(item: CartItem) { this.cart.updateCart(item).subscribe((items) => { alert('Cart Updated'); this.items = items.map((updated) => { const it = this.items.find(it => updated.id === it.id); updated.product = it!.product; return updated; }); }); }In the
CheckoutViewComponent, embed the cart table like this:<app-cart-table></app-cart-table>
The Finish View
This view simply has a header at the top that says “Thanks for Shopping!” along with the title on the browser tab. Below the header is an image and a “Home” button to return the user to the default / route of the application.
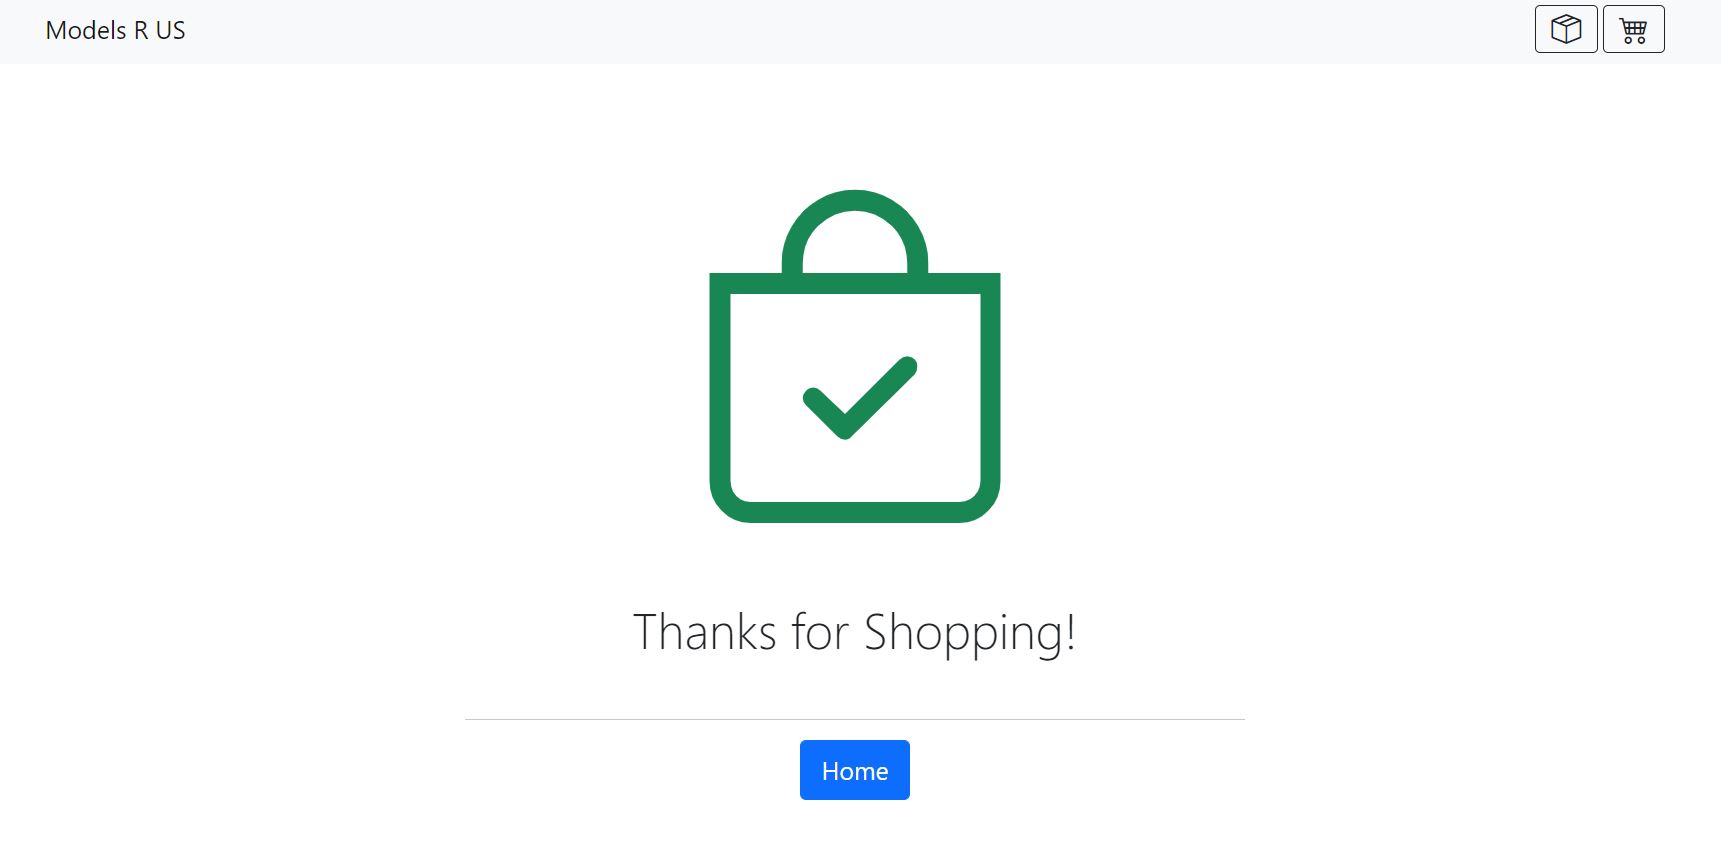
Finish View Component — The Raw HTML
Here’s the HTML for the
FinishViewComponent. Convert this into an Angular template.<div id="finish" class="container-lg container-fluid"> <div class="row align-items-start mt-4"> <div class="col col-lg-6 offset-lg-3 text-center"> <i class="bi bi-bag-check text-success" style="font-size: 200pt"></i><br> <h1 class="display-6 mt-1">Thanks for Shopping!</h1> </div> </div> <div class="row align-items-start mt-4"> <div class="col col-lg-6 offset-lg-3 text-center"> <hr><button class="btn btn-primary btn-lg">Home</button><!-- goto: / --> </div> </div> </div>
Flow & Navigation
-
Your frontend must add a “ShipTo” button appearing in the navbar at the top of all views. It leads to the
ShipToview when clicked.Here’s the HTML for the updated
NavbarComponent. Convert this into an Angular template.<nav class="navbar sticky-top navbar-expand-lg navbar-light bg-light"> <div class="container"> <a href="/" class="navbar-brand">Models R US</a> <div class="d-flex"> <a href="/shipTo" class="btn btn-outline-dark pt-0 pb-0 me-1"><i class="bi bi-box-seam fs-4"></i></a> <a href="/cart" class="btn btn-outline-dark pt-0 pb-0"><i class="bi bi-cart4 fs-4"></i></a> </div> </div> </nav> -
Your
Cartview must have a button captioned “Checkout”. If the user has already filled in the shipping address (you detect that by noting that the—locally-stored—shippingAddressobject within theShippingServiceis not empty) then clicking this button leads to theCheckoutview. Otherwise, it leads to theShipToview.Modify your
CartViewComponent’s template with this bit of HTML (and convert it into a template):... <div class="row align-items-start"> <div class="col text-center"> <button class="btn btn-success btn-lg">Checkout</button><!-- goto: /checkout --> </div> </div> </div>
Final Touches (Optional but Recommended)
Here are some optional final touches to your Project E:
Updating the Cart when Checking Out
You might notice that nothing happens when you checkout right now. The cart stays unchanged and the app never tells the server that the user checked out. To fix this, we could make an URL endpoint in our Node server on
/api/cart/checkoutthat writes the cart items and shipping information to anorders.txtfile (or simply logs it to the server’s console) and then empties the cart. Then, when the user clicks on theCheckoutbutton in the Checkout view, our application can send the shipping information to that backend endpoint via aPOSTrequest. Remember that you will need to update theCartServicewith a newcheckoutCartmethod.
Prevent Checking Out an Empty Cart
Right now the Cart view shows the
Checkoutbutton, regardless of the number of items within the Cart, including when it is empty. To fix this, we can add a variable to our CartViewComponent:cart: CartItem[] = [];Then, test whether to show the
Checkoutbutton based on whether thecart.length > 0. But before we can do that, we need to access the cart items with the CartTableComponent. To do this, use@Output().In the
CartTableComponent, we add this:@Output() onCartUpdate = new EventEmitter<CartItem[]>();Be careful: There are two
EventEmitterclasses. We want to one in@angular/core.Then, each time we get or update the Cart, we invoke this:
this.onCartUpdate.emit(this.items); // items: CartItem[]In the
CartViewComponent, we edit its template, like this:<app-cart-table [updatable]="true" (onCartUpdate)="cartUpdate($event)"></app-cart-table>And implement the
cartUpdatemethod:cartUpdate(cart: CartItem[]) { this.cart = cart; }Note:
$eventis the Cartitemsarray emitted from within theCartTableComponent.
Submitting Your Work
Zip up your entire project, except for the node_modules directory, into a E.zip archive file and upload your files to the course cloud so you can use it during the tests. (You can also upload it to your Github, Google Drive, DropBox, S3, or some other cloud service).
$ zip -r -y E.zip .
$ zip -d E.zip node_modules
$ submit 4413 E E.zip