EECS 4443 / EECS 5443 – Mobile User Interfaces
Winter 2022
Lab #2

Introduction
In this lab exercise, you will study and modify the Demo_Buttons Android application. The application demonstrates the most common types of buttons used in Android UIs. The demo program includes (at least) two deficiencies:You are asked to correct these deficiencies (and a few others) in this lab. You are also asked to add an additional image button to the UI. Preparation:
- The application specifies a single UI layout – for portrait orientation. If the device orientation changes to landscape, the same UI layout is used. The result for some devices is that the UI extends off the display when in landscape orientation.
- The values of the UI's state variables are lost when the device orientation changes.
As with Lab #1, you should treat this lab as an assignment. Try to finish the lab prior to the scheduled lab period. Debugging is time-consuming and the scheduled lab will be busy. The TA will work with all students, as time permits, checking work and helping with debugging.
- Lab #1 – If you have not completed Lab #1, do so now before proceeding with this lab exercise.
- Demo_Layout – This demo program was discussed and demonstrated during classroom lectures. Now it's your turn. Download the Demo_Layout project file, create an Android project from the file. Run the application and observe its behaviour. As well, study the JavaDoc (API), the linked-to resources, the source Java code, and the XML code in
res/layout/main.xml(portrait) andres/layout-land/main.xml(landscape).Objectives
Upon completing this lab, students will have the skills to do the following:
- Incorporate any of the standard button components in an Android UI.
- Incorporate a stylized image button in an Android UI.
- Implement an Android application that includes a separate layout for portrait and landscape screen orientations.
- Implement an Android application that saves and restores state variables when the device orientation changes.
Task 1 – Load the “Demo_Buttons” Project
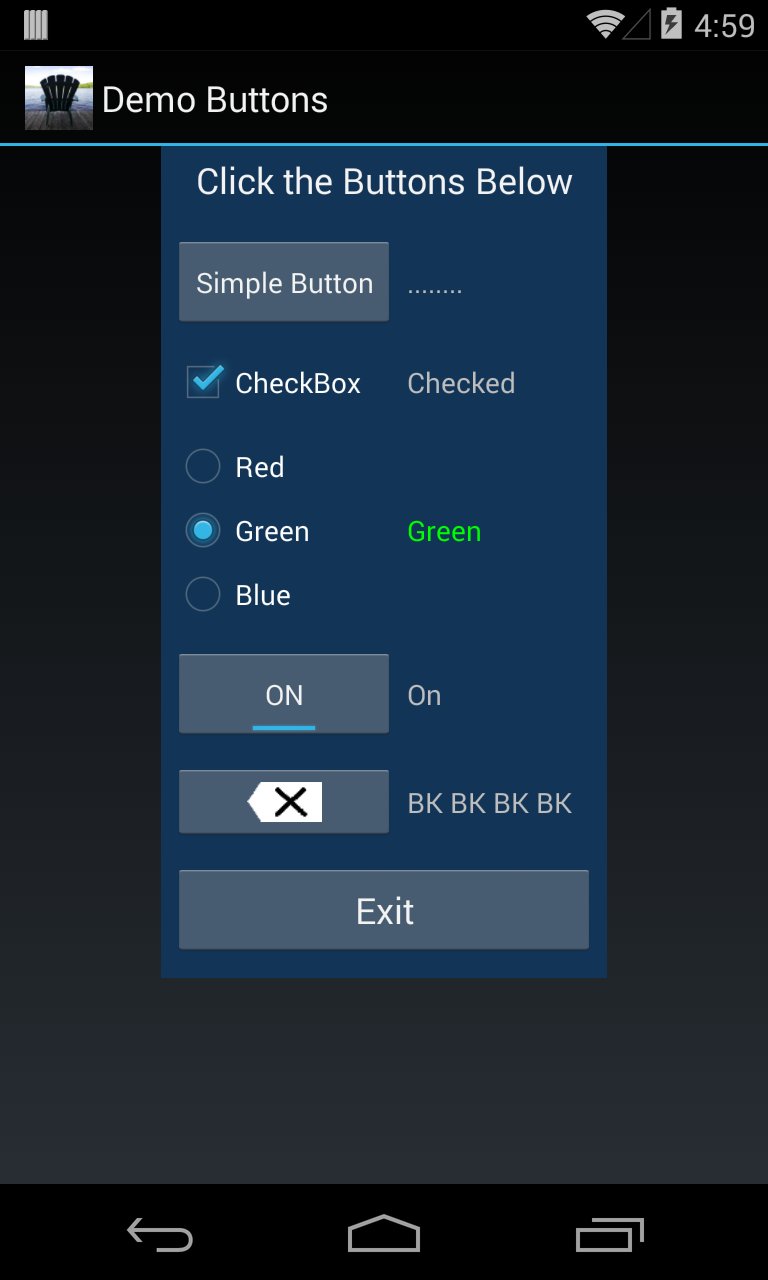
Download the Demo_Buttons project file and create an Android project in your workspace. Follow the same procedure as given in Lab #1, Task 2. Read the JavaDoc (API) for Demo_Buttons, including the linked-to resources. Study the source code inDemoButtonsActivity.java. Study the XML code in/res/layout/main.xml.
Task 2 – Run the Application
Run Demo_Buttons. Follow the same procedure as given in Lab #1, Task 3. Click the buttons in the UI and observe the output.
Task 3 – Personalize the Project
Make a personalized version of the Demo_Buttons project. Follow the procedure given in Lab #1, Task 4. All modifications (see next Task) are to be made in the new personalized version of the project.
Task 4 – Modify, Debug
Make the following changes to the personalized project. As with Lab #1, please document your changes via source-code comments. Indicate what you did, and why you did it.Steps 3 and 4 above were elaborated during classrooms lectures using Demo_Layout as an example. Review this demo program for the general idea of what you need to do here. A few additional ideas are given below. The UI for Demo_Buttons organizes the buttons vertically. For each button there is a text field to the right. As buttons are clicked (tapped with the finger), the text field is updated with status information. This organization works well for portrait orientation. For landscape orientation, it might be better to organize the buttons horizontally, with the text field below each button. However, this is for you to decide. In designing the UI layout for landscape orientation, you might want to begin by sketching a layout. You have more room horizontally, but less room vertically. Rearrange and organize the UI components, accordingly. Consider properties like margins, padding, spacing, alignment, font sizes, etc. The goal is to create a user interface that is usable, efficient, and asthetically pleasing. Suggestion: To assist in debugging the Java code, use
- Background Color. The background color in Demo_Buttons is black around the outside and dark blue ("
#ff123456") around the buttons and text. Modify this so that the same background colour fills the display. To clarify, this modification only applies to the Application UI:Feel free to use a colour of your own choosing. 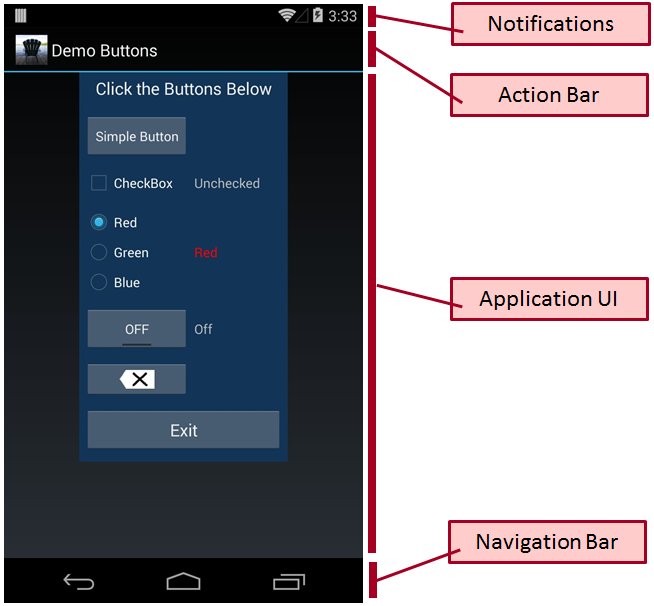
- Exit Button. Android applications do not need a button to terminate the application. (The Back button on the Navigation Bar serves that purpose.) Remove the Exit button.
- Layout. Modify the UI to include separate layouts for portrait and landscape display orientations. Use a horizontal arrangements of UI components for the landscape orientation.
- State Variables. Modify the UI to save and restore state variables when the device orientation changes.
- Original Feature. Add a new feature of your own design. This requirement is open-ended: It's up to you! Add some feature to the UI that makes it a better user interface. Try to be original.
Log.istatements to print the values of variables or "got here" messages.
Task 5 – TA Checkpoint
Checkpoint
When ready, write your name and workstation number on the whiteboard and the TA will meet with you as soon as he or she can. Be ready to answer TA questions about the modifications you have made or other details in the modified demo program.
Task 6 – Zip and Submit the Modified Project
After the TA has "checked off" your modified project, create a single zip file of the entire project and submit it. Follow the procedure given in Lab #1, Task 7. Of course, for this lab, you are submitting to "4443 lab2" and you are submittingDemo_Buttons_99999.zipwhere99999is the last five (5) digits of your student number.
NOTE: To receive a grade for a lab, you must submit the zip file and demo your work to the TA (and get "checked off"). The demo must be done during the scheduled lab period.
--- End of Exercise ---