EECS2030 Lab 01 Part 1
Sep 09
Due: Sep 17, 2018 before 1:00PM
Introduction
The purpose of this lab is to review the following basic Java concepts that should have been covered in your previous courses:
- style
- using
intanddoublevalues and variables - arithmetic and the methods provided in
java.lang.Math -
booleanexpressions - using objects
-
ifstatements - using
Strings - using
Lists -
forloops
This lab also introduces code testing using JUnit. This lab will be graded for style and correctness.
Before you begin
The API for the class that you need to implement can be found here.
A local copy of the Java API can be found here.
Style Rules
The style rules are not overly restrictive in EECS2030.
1. Your programs should use the normal Java conventions (class names begin with an uppercase letter, variable names begin
with a lowercase letter,
public static final constants should be in all caps, etc.).
2. In general, use short but descriptive variable names. There are exceptions to this rule; for example, traditional loop variables are often called i, j, k, etc.
Avoid very long names; they are hard to read, take up too much screen space, and are easy to mistype.
3. Use a consistent indentation size. Beware of the TAB vs SPACE problem: Tabs have no fixed size; one editor might interpret
a tab to be 4 spaces and another might use 8 spaces. If you mix tabs and spaces, you will have indenting errors when
your code is viewed in different editors.
4. Use a consistent brace style:
// left aligned braces

class X
{
  public void someMethod()
  {
    // ...
  }

  public void anotherMethod()
  {
    for (int i = 0; i < 1; i++)
    {
      // ...
    }
  }
}
or
// ragged braces

class X {
  public void someMethod() {
    // ...
  }

  public void anotherMethod() {
    for (int i = 0; i < 1; i++) {
      // ...
    }
  }
}
5. This one always causes problems for students. Insert a space around operators (except the period ".").
The following
    // some code somewhere
    boolean isBetween = (x > MIN_VALUE) && (x > MAX_VALUE);
    int someValue = x + y * z;
is much easier to read than this
    // AVOID DOING THIS

    // some code somewhere
    boolean isBetween=(x>MIN_VALUE)&&(x>MAX_VALUE);
    int someValue=x+y*z;
6. Avoid using "magic numbers". A magic number is a number that appears in a program in place of a named constant. For example, consider the following code:
int n = 7 * 24;
What do the numbers
7 and
24 mean? Compare the code above to the following:
final int DAYS_PER_WEEK = 7;
final int HOURS_PER_DAY = 24;
int n = DAYS_PER_WEEK * HOURS_PER_DAY;
In the second example, the meaning of
7 and
24 is now clear (better yet would be to also rename
n).
Not all numbers are magic numbers. You can usually use the values
0,
1, and
2 without creating a named constant. If you ever find yourself doing something like:
final int TEN = 10;
then you are probably better off using
10 and explaining its meaning in a comment.
7. A good IDE (integrated development environment) such as eclipse will correct many style errors for you. In eclipse, you can select the code that you want to format, right click to bring up a context menu, and choose Source -> Format to automatically format your code.
Getting started
These instructions assume that you have completed Lab 0 and are working in the Prism lab.
Start eclipse by typing
eclipse & into a terminal, or by using the menu located in the bottom left corner of the screen.
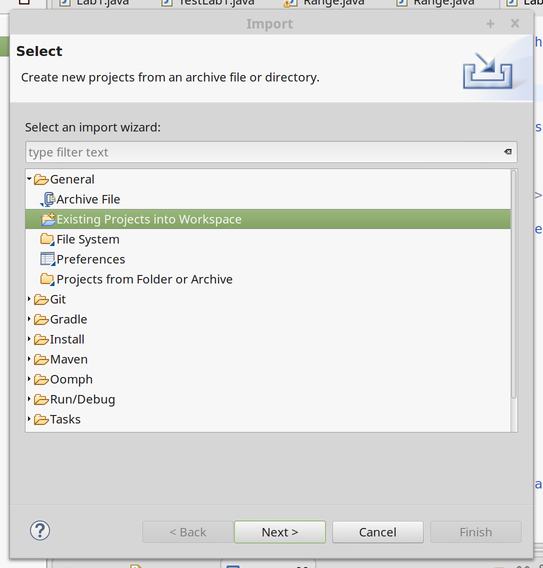
In this lab, you will import an existing project rather than starting everything from scratch. In the eclipse File menu, choose the Import... menu item.
In the
Import dialog box that appears, choose the
Existing Projects into Workspace item and click
Next:
If you are working on a Prism lab computer:
Click on the
Select archive file radio button. Click on the
Browse... button and select the file
/eecs/dept/www/course/2030/labs/lab1/lab1_project.zip. Click the
Finish button to import the project:
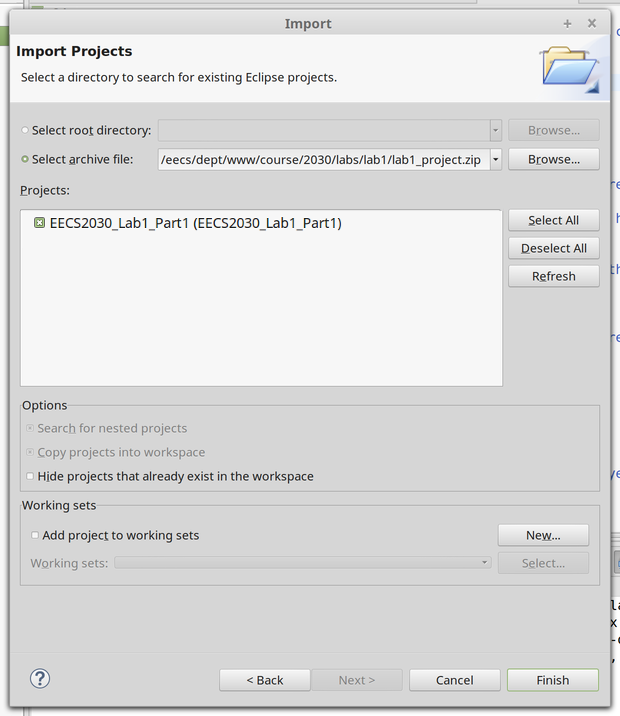
If you are NOT working on a Prism lab computer:
Download the
following zip file. Click on the
Select archive file radio button. Click on the
Browse... button and select the file that you just downloaded. Click the
Finish button to import the project.
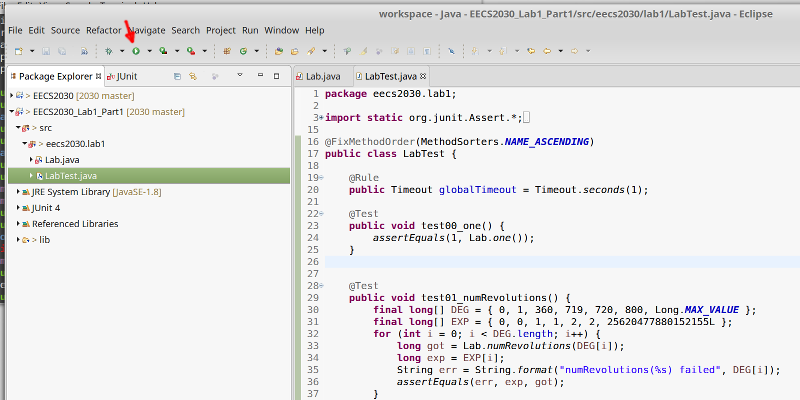
On the left-hand side of the eclipse window, you will see a tab labelled
Package Explorer. Use the small triangles to expand the
Lab1 contents, then the
src contents, and finally the
eecs2030.lab1 contents. Double-click on
Lab.java and
TestLab.java to open these files in the editor:

TestLab.java is a test class that contains unit tests for all of the methods that you will implement in this lab. You will learn
more about unit tests in your next lecture. For now, all you need to know is that you can use the test class to check
for errors in the methods in
Lab1.java.
Click on the
TestLab.java tab in the editor window to view the contents of
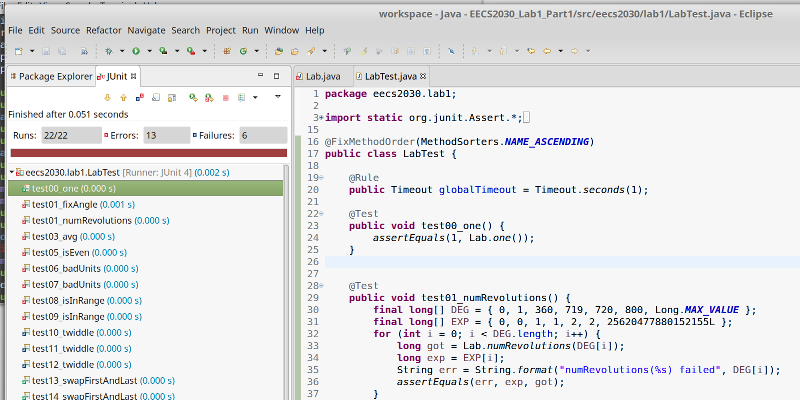
TestLab.java. Run the test class by pressing the green run button indicated by the red arrow in the figure below:
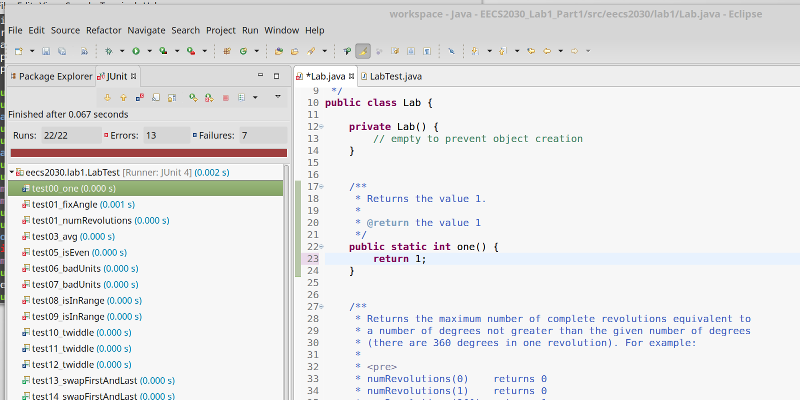
The results of running the tests are shown to you in the
JUnit
tab located on the left-hand side of the eclipse window (see figure above). Notice that all of the tests have a blue or red x beside
them; the blue x indicates that the test has failed and the red x
indicates that the test does not compile. In the
Failure Trace
panel, some diagnostic information is shown to you. For the
test00_one test, the diagnostic information is indicating that the test expected a value of
1 but received a value of
0. It seems like there is something wrong with our implementation of the
one method.
Click on the
Lab.java tab in the editor window to view the contents of
Lab.java. Scroll down to the
one method (the first method in the class). If you read the API for the method, you will see that the method postcondition
promises to return the value
1. However, when you examine the body of the method, you will see that the method returns
0, which is obviously incorrect.
Edit the return value of the method so that it returns the correct value as shown below:
Click on the
TestLab.java tab in the editor window to view the contents of
TestLab1.java. Re-run the test class; you should see the following:
Notice that the test
test00_one now has a green check mark beside it indicating that the test has passed. Unfortunately, the other tests are
still failing.
In the remainder of this lab, you will use the test class to help you fix the remaining methods in the
Lab class. Follow the remainder of the lab to review some fundamentals of the Java language and complete the exercises
in the pink sections.
int division
Any arithmetic operation involving two
int values always produces another
int value. Dividing two
int values in Java produces the same result as dividing the two values as real numbers and discarding the fractional
part of the result; an exception is thrown when dividing by
0:
| Expression | True Division | Java Division |
| 6 / 2 | 3 | 3 |
| 7 / 3 | 2.33... | 2 |
| 1 / 2 | 0.5 | 0 |
| -9 / 5 | -1.8 | -1 |
| 3 / 0 | ∞ | ArithmeticException |
A common usage of
int division is when you want to evenly distribute a number of whole items between a number of groups.
  public static int perPerson(int nItems, int nPeople) {
    int result = nItems / nPeople;
    return result;
  }
int remainder
Java provides the remainder after division operator
%. For two
int values
x and
y, the value of
x % y is the
int value equal to the remainder after dividing
x by
y:
| Expression | Java Division |
| 6 % 2 | 0 |
| 7 % 3 | 1 |
| 1 % 2 | 1 |
| -9 % 5 | -4 |
| 9 % -5 | 4 |
| 3 % 0 | ArithmeticException |
The sign of the result is defined to be equal to the sign of the first operand (the value to the left of the
% operator).
A common usage of
int division is when you want to evenly distribute a number of whole items between a number of groups.
  public static int remainder(int nItems, int nPeople) {
    int result = nItems % nPeople;
    return result;
  }
Exercise #1
Complete the methods
numRevolutions(long degrees) and
fixAngle(long degrees).
Note that in these methods, you should create named constants for any constant numeric values that you use.
Run the JUnit tester after you complete each method to check your work.
Mixing
int and
double
Be careful when using
int values to compute a
double value. For example, suppose that you compute the fractional value one-third like so:
double oneThird = 1 / 3; // results in 0.0
Java uses the types of the operands to determine what version of an operator to use. In this case, the
1 and the
3 are both
int literals; therefore, Java uses
int division to compute the value of
1 / 3 before converting the computed value to
double and assigning it to
oneThird.
The solution is convert one or both of the operands to
double to force Java to use
double division; any of the following will work:
double oneThird = 1.0 / 3;
double oneThird = 1 / 3.0;
double oneThird = 1.0 / 3.0;
double oneThird = (0.0 + 1) / 3;
double oneThird = (double) 1 / 3;
Exercise #2
Complete the method
avg(int a, int b, int c).
You do not need to create a named constant for the value 3.
Run the JUnit tester after you complete each method to check your work.
Comparing primitive values
Java's primitive type for representing values that can be
true or
false is named
boolean. One way to generate a
boolean value is to compare two numeric values. Java provides the following equality and comparison operators for numeric
values:
| Expression | Meaning |
| x == y | is the value of
x equal to the value of
y
|
| x != y | is the value of
x not equal to the value of
y
|
| x < y | is the value of
x less than the value of
y
|
| x > y | is the value of
x greater than the value of
y
|
| x <= y | is the value of
x less than or equal to the value of
y
|
| x >= y | is the value of
x greater than or equal to the value of
y
|
An integer is odd if the remainder after dividing by
2 is not equal to
0. A method that determines if an integer is odd could be implemented like so:
  public static boolean isOdd(int x) {
    int remainder = x % 2;
    boolean result = (remainder != 0);
    return result;
  }
Exercise #3
Complete the methods
isEven(int x) and
badUnits(String units).
Run the JUnit tester after you complete each method to check your work.
Boolean expressions
boolean values can be combined to produce a new
boolean value using boolean algebra. In boolean algebra, the basic operations are AND, OR, and NOT, and the corresponding
Java operators are:
| boolean operation | Java operator |
| AND | && |
| OR | || |
| NOT | ! |
Use the AND operator
&& to determine if two
boolean values are both true. For example, if you want to determine if a number
x is greater than both
y and
z you could write:
boolean result = (x > y) && (x > z); // is x greater than y and is x greater than z
The parentheses are not necessary because
&& has lower precendence than the comparison operators, but are included in the example to help readability.
Use the OR operator
&& to determine if at least one of two
boolean values are both true. For example, if you want to determine if a number
x is greater than either
y or
z you could write:
boolean result = (x > y) || (x > z); // is x greater than y or is x greater than z
Again, the parentheses are not necessary.
The NOT operator
! negates a
boolean value. Consider the following:
  boolean isEqual = (x == y);
  boolean isNotEqual = !equal;
In the example,
isEqual is
true if
x and
y have the same value, and
false otherwise. The value of
isNotEqual is
true if
x and
y have the different values, and
false otherwise.
Exercise #4
Complete the method
isInRange(double x, double lo, double hi).
Run the JUnit tester after you complete the method to check your work.
if statement
Java's
if statement lets you choose to execute a block of code depending on a
boolean value. For example, the following method uses an
if statement to validate an input to the method:
  public static double circleCircumference(double radius) {
    if (radius < 0.0) {
      radius = -radius;     // make the radius positive
    }
    return 2.0 * Math.PI * radius;
  }
The method in the above example computes the circumference of a circle given a radius. The method first checks if the value
of
radius is negative; if
radius is negative, the code inside the block of the
if statement is run (shown in red). The code inside the block simply converts the value of
radius to the correct positive value. If
radius is not negative, then the block in red does not run. Whether or not the block in red runs, the value of the circumference
is computed and returned.
Instead of correcting the negative radius value, we might have chosen to indicate that an error has occurred by throwing an exception:
  public static double circleArea(double radius) {
    if (radius < 0.0) {
      throw new IllegalArgumentException("negative radius");
      // method stops running here because an exception was thrown
    }
    return Math.PI * radius * radius;
  }
The method in the above example computes the area of a circle given a radius. The method first checks if the value of
radius is negative; if
radius is negative, the code inside the block of the
if statement is run (shown in red). The code inside the block creates an
IllegalArgumentException object and throws the exception. Throwing the exception causes the method to stop running immediately. If
radius is not negative, then the block in red does not run, and the area is computed and returned.
if-else statement
An
if-else statement causes exactly one of two separate blocks of code to run depending on a
boolean value. For example, the following method computes the minimum of two values using an
if-else statement:
  public static int min2(int x, int y) {
    int min;
    if (y < x) {
      min = y;
    }
    else {
      min = x;
    }
    return min;
  }
In the above example, the red block is run if the value of
y is less than the value of
x; otherwise, the block in blue is run. After the red or blue block runs, the value of
min is returned.
if statement
In situations where exactly one of several blocks of code must run, you can chain multiple
if-else statements together:
  public static int contains2(double x, Range range) {
    int result;
    if (x <= range.getMinimum()) {
      result = -1;
    }
    else if (x >= range.getMaximum()) {
      result = 1;
    }
    else {
      result = 0;
    }
    return result;
  }
The example code above determines if a value
x lies to the left of a
Range, the right of a
Range, or is strictly inside the
Range. The red block is run if
x is less than or equal to the minimum value of the range, otherwise the blue block is run if
x is greater than or equal to the maximum value of the range, otherwise the purple block is run. After the red, blue,
or purple block runs, the value of
result is returned.
Exercise #5
Complete the method
twiddle(HiddenCounter c).
Run the JUnit tester after you complete each method to check your work.
List indexing and length
Like strings, lists use a
0-based index to access individual elements. The
get method is used to get the value of an element using an index. Assume that
t is the list of 4
Double references
[-0.33, 0.25, 8.99, 24.01] and that
elem is a variable of type
double; then the following table shows the results of indexing into the list:
| Expression | Value of
elem
|
| elem = t.get(0); | -0.33 |
| elem = t.get(1); | 0.25 |
| elem = t.get(2); | 8.99 |
| elem = t.get(3); | 24.01 |
| elem = t.get(4); | throws an
IndexOutOfBoundsException
|
The
set method is used to set the value of an element using an index. Assume that
t is the list of 4
String references
["abc", "xyz", "123", "###"]; then the following table shows the results of setting the elements of the list:
| Expression | Elements of
t
|
| ["abc", "xyz", "123", "###"] | |
| t.set(0, "ABC"); | ["ABC", "xyz", "123", "###"] |
| t.set(1, "XYZ"); | ["ABC", "XYZ", "123", "###"] |
| t.set(2, "789"); | ["ABC", "XYZ", "789", "###"] |
| t.set(3, "***"); | ["ABC", "xyz", "789", "***"] |
| t.set(4, "oops"); | throws an
IndexOutOfBoundsException
|
The number of elements in a list is returned by the
size method.
The following method swaps the position of the elements in a list of size 2:
public static void swap2(Listt) { if (t.size() != 2) { throw new IllegalArgumentException("list size != 2"); } // get the first two elements int t0 = t.get(0); int t1 = t.get(1); // set the first two elements swapping their original order t.set(0, t1); t.set(1, t0); }
Exercise #6
Complete the method
swapFirstAndLast(List<Double> t).
Run the JUnit tester after you complete each method to check your work.
for-each loops
Many tasks involving lists require using
but not setting each element in the list. To visit each element of a list (sequentially from the first element
to the last) you can use a
for-each loop. The following is an example of a
for-each loop that simply prints each element of a list of strings on a separate line:
  public static void print(List<String> t) {
    for (String s : t) {
      System.out.println(s);
    }
  }
The loop above reads as "for each
String s in
t." Inside the body of the loop (shown in red), you use the variable
s to refer to the current string in the list
t. The loop body runs once for each element of
t starting with the first element of
t and ending with the last element of
t. If the list
t is empty then the loop body never runs (and the method does nothing).
Looping over the elements of a sequence is called
iterating over the sequence. Iterating over a sequence of $n$ elements with a
for-each loop requires running the loop body $n$ times; each time the loop body runs is called an
iteration of the loop.
The following is slightly more complicated example that finds the greatest value in a list of
Integer values:
  public static int max(List<Integer> t) {
    int result = Integer.MIN_VALUE;
    for (Integer elem : t) {
      if (elem > result) {
        result = elem;
      }
    }
    return result;
  }
The method starts by assuming the largest value in the list is the
smallest possible
Integer value. The method then uses a
for-each loop to iterate over the elements of the list. During each iteration, the current element of the list is compared
to
result; if the current element is greater than
result then we know that we've found an element that is greater than the greatest element seen so far, and we store the
value of the element in
result. After iterating over all of the elements,
result holds the greatest value of the elements in the list.
Exercise #7
Complete the method
numShortWords(List<String> t).
Run the JUnit tester after you complete each method to check your work.
Submit your work
To submit your work, you need to transfer your
Lab1.java file to a Prism lab computer. You can use a USB stick, a secure FTP program, or a secure copy program to do so.
Once you have transferred your files, log onto a Prism computer and follow the instructions below.
These instructions will be updated to include instructions for submitting from a computer outside of the Prism labs.
Submit for students NOT working in a group
If you are
not working in a group, submit your solution using the
submit command. Remember that you first need to find your workspace directory, then you need to find your project directory.
In your project directory, your files will be located in the directory
src/eecs2030/lab1
submit 2030 lab1part1 Lab.java
Submit for students working in a group
If you are working in a group, create a plain text file named
group.txt. You can do this in eclipse using the menu
File -> New -> File. Type your login names into the file with each login name on its own line. For example, if
the students with login names
rey,
finn, and
dameronp, worked in a group the contents of
group.txt would be:
rey
finn
dameronp
Submit your solution using the
submit command. Remember that you first need to find your workspace directory, then you need to find your project directory.
In your project directory, your files will be located in the directory
src/eecs2030/lab1
submit 2030 lab1part1 Lab.java group.txt
Submit your work from outside the Prism lab
It is possible to submit work from outside the Prism lab, but the process is not trivial; do not attempt to do so at the last minute if the process is new to you. The process for submitting from outside of the Prism lab involves the following steps:
- transfer the files from your computer to the undergraduate EECS server red.eecs.yorku.ca
- remotely log in to your EECS account
- submit your newly transferred files in your remote login session using the instructions for submitting from within the lab
- repeat Steps 1 and 3 as required
Windows users will likely need to install additional software first. Mac users have all of the required software as part of MacOS.