
src folder of your Android project and store the zip file on the desktop (the video entitled AndProject shows you how). Name the file Xsrc.zip (where X is the name of the lab) and drag it to the lab submission site.For this lab you will be programming a mobile app that controls a robot that has been dropped into a rectangular grid of square rooms. Each wall of each room has been painted a different colour: the North wall is Neon, the East wall is Eggplant, the South wall is Sandy, and the West wall is Wallnut. The robot uses these colours to orient itself. Walls between rooms have doors in them, but walls on the edge do not. The goal of the robot is to determine how many rooms are in the grid.
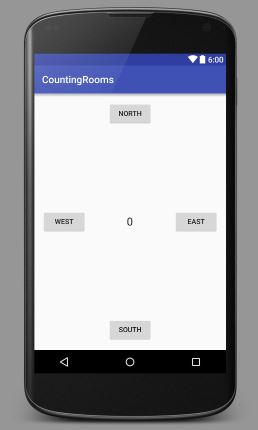
Implement a view that has four buttons, labelled North, East, South and West, and a text view labelled 0. These buttons and text view should be localed as follows.

Implement a model with the following features.
An attribute that represents a counter that counts the number of times any of the four buttons is pressed. Use a descriptive name.
A constructor that initializes the counter to zero.
Four methods, each corresponding to one of the four buttons. Each method increments the counter by one. In addition, one method that returns the counter as a String. Hint: use the method String.format. The API of the String class can be found here.
Implement a controller with the following features. Recall that a controller is called an activity in the Android world. A default implementation of such a class is produced when an Android project is created.
An attribute that represents a model.
onCreate methodWhen the Android project is created, an activity class with the following onCreate method is generated.
protected void onCreate(Bundle savedInstanceState)
{
  super.onCreate(savedInstanceState);
  this.setContentView(R.layout.activity_counting_rooms);
}
Note that this. is missing in the last line of generated code, but can be added without changing the behaviour of the code. Also note that activity_counting_rooms is derived from the name of the Android project (in this case CountingRooms) and, hence, might be different.
Add one line of code to the onCreate method in which you initialize the attribute that represents the model. Hint: use the keyword new.
Introduce four methods that are associated with the four buttons. For example, the method associated with the button labelled North can be implemented as follows.
public void north(View view)
{
  this.m.n();
  this.t();
}
Instead of m (the name of the attribute representing the model), n (the name of the method of the model class corresponding to the North button), and t (the name of a method in the this controller class that we will discuss below), use descriptive names.
Since all four methods need to update the text view, introduce a private method with name t (please think of a better name) that accomplishes this (see Lab 1 how to update the tex view). This avoids code duplication and makes your code easier to maintain.
Deploy your app on a tablet and test it. Only once it produces the desired behaviour, move on to the next iteration.
Add the following constants to your model (in between the attribute and the constructor).
private static final int WIDTH = 4;
private static final int HEIGHT = 5;
These constants capture that the rectangular grid is four rooms wide and five rooms in height.
Add attributes that capture the location of the robot, that is, in which room it is. This location is represented by the x- and y-coordinate of the room. We assume that the North West corner has coordinate (0, 0).

Initially, the robot is in the NorthWest corner. hence, initialize the x- and y-coordinate both to zero.
Add four methods to the model, one for each direction. For example, for North the method has the following header.
public boolean canGoNorth()
{
  ...
}
The method returns a boolean that captures whether the robot can go North. For example, if the robot is in location (2,0), the method returns false, whereas if the robot is in location (1,4) the method returns true. Refer to the constants WIDTH and HEIGHT using M.WIDTH and M.HEIGHT, where M is the name of your model class.
Modify the four methods that were already part of the model such that
canGo???? methods to determine if robot can move), andWe want to distinguish those buttons that capture directions in which the robot can move from the buttons representing directions in which the robot cannot move. The former should be green, whereas the latter should be red. For example, if the robot is in the initial location (0,0) then the North and West buttons should be red and the South and East buttons should be green. For setting the colour of a button, use the setBackgroundColor, the API of which can be found here (see Lab 1 how to access the button).
Deploy your app on a tablet and test it.
This lab is based on the nifty assignment designed by Luther A. Tychonievich, Mark S. Sherriff, and Ryan M. Layer which can be found here.