CSE 1710.03A Programming for Digital Media
Lab 02
Due date: Sep 21, 2009 at 20:00
Installing JES
If you have not already done so, you need to install JES on your computer. You can either install JES from the cd that came with the book, or you can download it from: Mediacomp Software.
JES is already installed on the PRISM computer labs: To run, click on
Start -> Programs -> JES -> JES
Running a Program/Recipe in JES
- Start up JES.
Once JES starts, it has two primary areas. The top area is the program area. The bottom area is the command area.The program area is really an editor that allows us to create, modify and save functions. The command area is similar to the UNIX prompt in which we can execute commands. In JES, we have both the editor and prompt available to us at the same time. Read chapter 2 of the Guzdial book for more information.
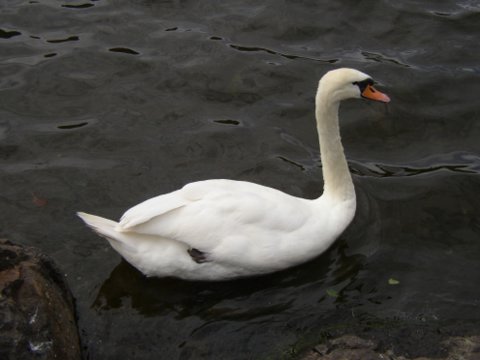
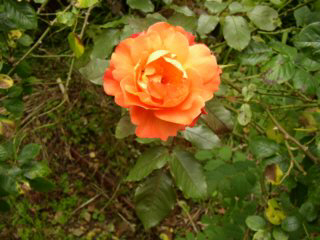
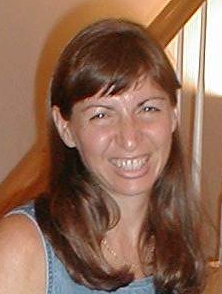
- Download and save the following pictures (also on the CD). On the PRISM lab computers, the Z: drive is a permanent storage area for you. In some file pick dialogs, the Z: drive's name is "homes on 'CS Samba 3.0.30 Server (pcserver)'(Z:)". Saving files to this drive on one computer can be accessed from another computer (even another computer in a different lab). It is suggested that you save your Python programs to the Z: drive as well as all other files you may want to keep. (You can save the images below by right clicking on them and selecting "Save Image As ...").
- Copy and paste the Jython code below into a new JES file.
# Simple Picture Example
def example1():
  file = 'barbara.jpg'
  picture = makePicture(file)
  show(picture)
  for pixel in getPixels(picture):
    redValue = getRed(pixel)
    newColor = makeColor( redValue, 0, 255 - redValue)
    setColor(pixel,newColor)
  repaint(picture)
- Now you must save and load the file. Click the Load button. A dialogue box will ask you if you would like to save. Click "ok," then save the file as "lab02.py". The file will then automatically load.
- The file "barbara.jpg" that we use in example1() is on the CD for this course, along with other pictures and images you will want to use in the future. To access these files easily, you need to copy them onto your computer from the disk.
- To make this recipe work, we need to know the entire path name of the file "barbara.jpg". The path name of a file is like its address in the computer. Each part of the path name gives the computer a smaller, more defined place to look for that file. Every drive, directory, and folder must be noted in the correct order and format for the computer to locate the file. Different operating systems like their path names to look certain ways. So, make sure you use the correct format. On the PRISM computers, the file will most likely be saved on the Z drive, so the path should be: Z:\barbara.jpg
- Windows users need to always place an "r" before any complete path name for a file when using JES. Your path entries in JES should always look like this: r"Z:\***\*****\......"
- In JES, all file names need to be surrounded by quotation marks. Your program/recipe should now look like this:
def example1():
  file = r"Z:\barbara.jpg"
  picture = makePicture(file)
  show(picture)
  for pixel in getPixels(picture):
    redValue = getRed(pixel)
    newColor = makeColor( redValue, 0, 255 - redValue)
    setColor(pixel,newColor)
  repaint(picture)
- Since we have made a change to our lab02.py file, we need to load it into JES before trying to run example1() again. So click on the Load button, and then reply "ok" to the save prompt. Next, click in the command area. Type example1() at the prompt (>>>) and hit enter. You should first see a picture of a woman and then it should be replaced by a red and blue picture of that same woman. You have just run a recipe in JES!
Writing a JES recipe and writing a picture to the harddrive
What if we wanted to show a different .jpg file? We would have to change the recipe to include the entire path name of the new file and then load the new recipe. We would have to do this every time we wanted to show a new picture. How annoying! Fortunately, there is an easier way to do this. There is a function called "pickAFile()" that will let you find the path to a file on your computer. This function allows you to show any .jpg file on your computer using only one recipe; all you have to do is pick which one you want to see when the computer prompts you.
Here is how you incorporate "pickAFile()" into our previous recipe. All you need to do is:
- Copy the following code and place it under the the example1() function.
# Example2()
def example2():
  file = pickAFile()
  picture = makePicture(file)
  show(picture)
  for pixel in getPixels(picture):
    redValue = getRed(pixel)
    newColor = makeColor( redValue, 0, 255 - redValue)
    setColor(pixel,newColor)
  repaint(picture)
- Since we have made a change to our lab02.py file, we need to load again to save the changes to the file.
- There is one more change we want to make. What if we want to see our picture after we quit JES or share our picture with someone else? JES has a way to do this as well. We use the command writePictureTo().To do this, we will add one more line of code to our recipe.
- At the very end of the recipe and at the same indentation as the repaint(picture) command we want to add the command writePictureTo(). writePictureTo() uses two things. First, the picture we want to write out. Second, the location we want to write it to(lets put in in the Z: drive). Our command will look something like this: writePictureTo(picture, r"Z:\SomePicture.jpg"), where SomePicture can be any name you like. It is very important not to forget the .jpg, and the name that you save it to should probably not be the same as an already existing file.
- If you get a message about a "spacing error", you are using inconsistent indentation in your recipe. Typically this occurs because you are mixing spaces and tabs. To fix this make sure you use either spaces everywhere (2 spaces are recommended) or tabs everywhere to indent each line.
- Next, you can type example2() at the prompt in the command area and hit enter. A File Browser window will appear, allowing you to choose which file you would like to show. Now you have to find the folder where you saved your files, which will most likely be in the Z: drive. Once there, click on any .jpg file that you want to open.
- Once again, you will first see the original picture, then the modified picture. As an added benefit you will now have your picture stored in the Z: drive.
Lab Questions and What to Turn in
Explain in English what is happening in each line of the recipe and what the words "def", "file", and "picture" mean in it. Write your answers at the top of your lab02.py file. Remember to save the file after you modify it.
You will have to start each line with the # symbol to tell JES that these lines are comments and should not be treated as code. Also at the very top of the file, put your name, studentID and date. Your file should look something like this:
# Name
# studentID
# Date
# answer to lab question
def example1():
  ...
How to submit the lab
This lab is to be handed in via the submit command on the Linux systems that are behind the PRISM lab infrastructure. The following requires that the files are on your Z: drive!
- Use PuTTY to log in to red.cse.yorku.ca. PuTTY can be found under Start -> Programs -> PuTTY -> PuTTY. Type red.cse.yorku.ca under "Host Name (or IP address)". Click on the "Open" button. Click "Yes" on the "Security Alert" that appears the first time you connect to red. Use the same username/password that you used to log in to the computer.
- This is a Linux environment. The command to list the files in the directory is ls. To change directories, use cd. For the following, you need to navigate to the relative place where you saved lab02.py on Z:. In other words, if you saved lab02.py in a subdirectory on Z:, you first need to go to that subdirectory by using the cd command.
- Issue the command
submit 1710 lab02 lab02.py
Note: You must do all the above steps correctly for receiving
full credit for this lab.